8 Top Headshot Image Editing Techniques using Photoshop for Quality Photos
With advancements in photo restoration and editing technologies, you are free to perform almost any type of editing, enhancement or restorations. Photoshop is one of the most advanced photo editing programs, which allows users to enhance or to manipulate photos in the most creative ways. However, Photoshop is a complex program and people need to dedicate quite a generous amount of effort and time to master the use of advanced Photoshop tools. Among other photo editing projects, headshot photo retouching remains as a major task that photographers have to handle on a routine basis. Are you wondering how to edit headshot images in Photoshop?
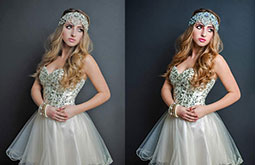
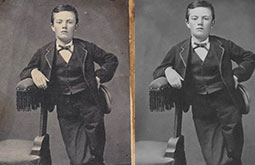
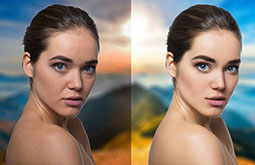
Headshot photo retouching is meant to eliminate flaws or imperfections that might be spoiling the appeal of headshot photos or portraits. The imperfections may manifest in the form of unwanted strands of hair, red-eye effects, pimple-marks or blemishes, shadows or contrast issues. An efficient photo editor can seamlessly nullify these defects and can use the most complex and sophisticated features of Photoshop so as to deliver finely-refined image versions. Headshot retouching support is commonly demanded by the corporate world and by businesses operating in fashion and retail industries.
Headshot photo retouching techniques
Eye Enhancement
The most important aspects of a headshot photo are the subject’s eyes. You can make the subject’s eyes come to life by enhancing the appeal of the irises. Begin by creating an eclipse over the irises. Increase the contrast and enhance the iris color. This would add an extra load of appeal to the eyes. You may find the Radial Filter option to be the ideal feature to perform this operation. You would find the Radial Filter option at the Camera Raw Filter toolbar of Photoshop CC. Now, apply the Brush to delete the outer parts until you cover all parts of the Iris. You can give the iris a darker appearance by lowering the Exposure. You can do this easily by using the Exposure option on the Radial Filter tab. Continue adjusting the saturation, clarity, and exposure till you are satisfied with the outcome. You can make the iris appear to be protruding out by darkening the edges to a certain extent. Eliminate the center of the circle using the Brush tool. Make sure to retain the edges that have a darker tinge. In order to copy the effects onto the other iris, press and hold Cntrl/Cmd+Alt and then pull the pins across the second eye.


Skin Softening
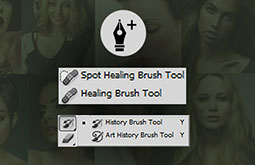
Expert photo editors can add a softened effect to the skin while ensuring that the natural look, feel, and glow are retained. The skin enhancement process starts with the elimination of blemishes, marks, or any other type of imperfections. You can make use of the Clone Stamp tool and the Spot Healing Brush to get rid of skin flaws. Apply the command Ctrl/Cmd + J to duplicate the layer. Invert the later by using the command Ctrl/Cmd+ I. Next, go to the Layers Panel and bring the opacity to 50 percent. Change the Blend Mode to Linear Light. Opt for “Convert to Smart Object” by right clicking on the layer. Now, visit the Filter tab and the “Other” option. Select “High Pass”. Set the skin to 9.9 pixels in order to make it appear blurry. Select Filter and then apply Blur Gaussian Blur to restore the skin’s natural texture. The Blur value should be one-third of the High Pass Filter value, which means that the value should be 3.3 in the example. Click Alt on the icon to add layer mask and this would conceal the effect. Now paint over the skin to reveal it gradually. When you perform edits on any layer, you should hide the effects by applying Alt-click on the icon. Click one more time to reveal only those parts that you would like to show in the final outcome.


Hotspot Removal
Hotspots are the bright spots in an image and they make a face look sweaty. You should use the Patch tool to fix hotspots. Sample out areas surrounding the hotspots. Next, pull them towards a clearer section. Create a new layer to facilitate this edit and select Content-Aware and Sample All Layers options from the tool bar. Optimize the opacity to replace the blaring highlight with a natural glow.

Image Sharpening
Image sharpening is an effective way to create a finer headshot retouch version. When you sharpen the facial features only on the red channel, you will keep the surrounding areas untouched, which would in turn contribute to the retention of skin softness. Choose the Red Channel from the Channels panel. Next, choose the Unsharp Mask. The settings would depend on the image resolution. Click on the RGB channel tab to observe the effects. The image may appear more detailed, but may still lack in sharpness. You need to note that image sharpening is a monotonous task that you may need to perform during a headshot retouching project. You may want to keep an Action recorded so that you can get the effects automatically applied and avoid doing repetitive tasks.


Dodge and Burn
You can add depth to an image through a creative and balanced application of dark and light elements. Click Alt and hold it and then click on “Create New Layer”. Select this layer to apply the Dodge and Burn effect. Set the mode to overlay and select the box that will apply a grey or neutral tone to the image. When you click on OK, you will get a new invisible layer. Darken or lighten certain portions of the face by using the Brush tool. The ideal Brush opacity should be 10 percent. Apply strokes of black below the cheekbones and other darker portions. Similarly, use white to lighten up the lighter portions of the face by pressing X. When you complete your work with the Dodge and Burn layer, you should choose Gaussian Blur in order to soften the layer and to harmonize the brushstrokes so as to create a finer finish.


Stray Hair Elimination
Use the Spot Healing Brush tool to get rid of stray hair. You should use this tool carefully because a smearing effect may get created over the head-hair meeting line. You can fix this issue by using the Clone Stamp or the Healing Brush tool to eliminate stray hair from the source. Once done, use the Healing Brush tool one more time. Get a sample color by painting on the area and apply this color to eliminate the strand.


Eye Bags Removal
Use the command Ctrl/Cmd + J to duplicate the background layer. Now click on the Patch tool and set it to “Normal” to maintain the normal texture. Create a rough selection by using a dark patch and then pull the selection over a clean area of the skin. A mark-free forehead is a perfect area to carry out this activity. Visit the Layers panel and lower the layer opacity by using the command Ctrl/Cmd + D. Continue adjusting the opacity till you get an outcome with a natural finish. Alternatively, you may choose the Clone stamp to duplicate the opacity to 20 percent and to soften the rough areas.


Brightness Enhancement
You can adjust brightness and contrast very easily in Photoshop. Select Image in the Menu Bar and then click on Adjustments and then click on the Brightness/Contrast option. You can change the overall brightness of an image by adjusting the brightness slider. Similarly, you can change the contrast by moving the contrast slider to the left or right. Click OK and the changes will be applied to the sampled layer.

Conclusion
You may find a tablet to be more handy and suitable when you are performing a headshot retouch. This is mainly because of the fact that you would be able to make precise changes by using a pen compared to the changes that you can do by using a mouse.
You can surely try various photo retouching/restoration techniques by yourself but if the outcome is really important for you, it would be a better idea to hire professional photo editing service providers who specialize in headshot photo retouching services.


