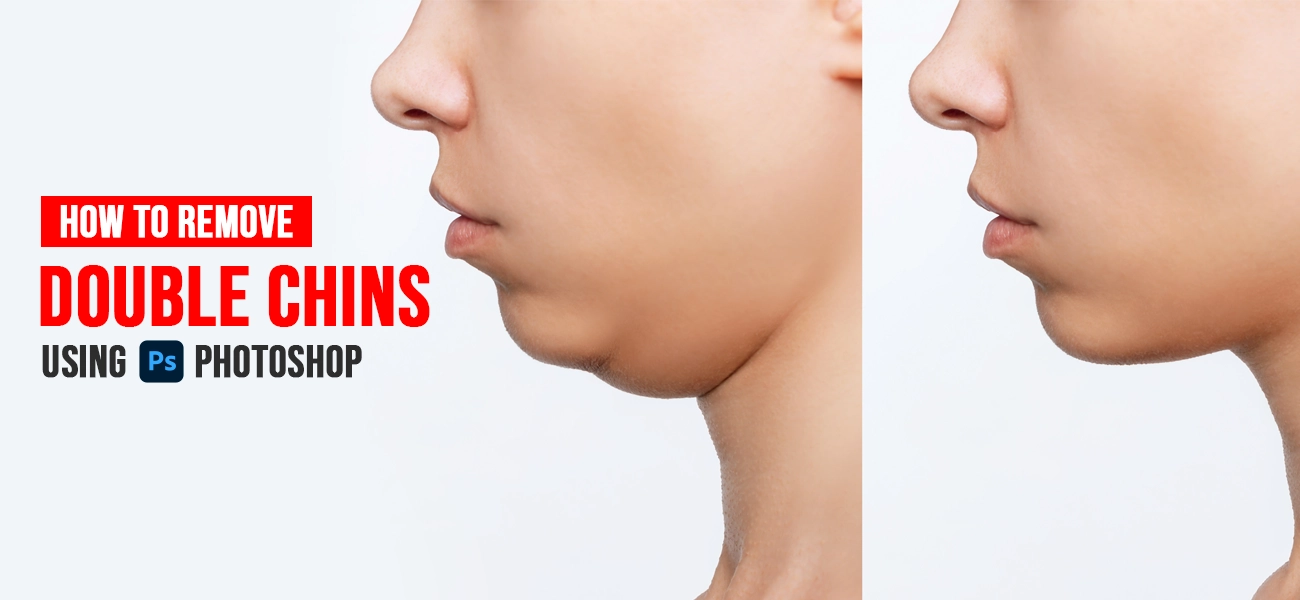
Steps to Remove Double Chin Using Photoshop
Double chins are frustrating. There’s not an ounce of doubt about it. It is a menace for most people- the photographer and the photographed alike. This is all the more applicable for fashion photoshoots. Though fashion models are fit and tend to have fewer facial fat deposits, one wrong angle or error in lighting can create the illusion of a double chin.
Fret not! Thanks to technology, we can now remove double chins from a photo using Photoshop. In just a few easy steps, photo retouchers can hide the annoying double chin and make the subject look perfect.
This article will explain the steps in detail. If you are a professional photographer or an individual wanting to get rid of any double chin trouble, read this article till the end. Let’s begin!
How does a double chin ruin a portrait?
First, let’s understand the fuss about the double chin and how it ruins an otherwise perfect shot. Although appearing harmless, this facial fat below the chin makes people look older and unfit. It is practically a nightmare for any photographer, professional or amateur. Because no one wants to appear older and heavier in a photo.
Interestingly, this is not just the case for chubby people. Even skinny individuals can look like they have a double chin if they tuck their faces inside. Thus, it is one such thing that everyone is too conscious of. Because these days, appearances are everything.
That said, all professional photographers must know how to deal with this and make the subject look young, beautiful, or handsome. Thankfully, we have Photoshop, the go-to photo editing tool. Using this intuitive tool, photo editors can hide facial double chins easily and quickly.
So, let’s begin our journey into our how to remove double chins in Photoshop tutorial!
Remove double chin in Photoshop: tutorial
-
Step #1: Select the photo and create a duplicate layer
- Select the photo you want to work on.
- Create a duplicate layer of the original image so that none of the edits affect it.
- Right Click “Layer”, then select “Duplicate Layer”.

-
Step #2. Trace the jawline with Pen Tool
- Draw a path around the chin you want to slim. This helps the editor get an idea of how the jawline will look once the double chin is removed.
- Go to the toolbar and select the Pen Tool, or press “P” on the keyboard.
- Click Ctrl + + or Cmd + + for Windows and Mac, respectively, to zoom into the picture.
- From the “Options” bar, change the Pen Tool mode to “Path”.
- Click on the left side of the subject’s jawline. Click on Shift and drag the mouse to the center of the chin. Do the same from the right. A curve will be formed.
- Connect the path to its starting point to close the path.
- Now, turn the path into a selection - To do this, go to Window > Paths.
- Then by right-clicking & choose “Make Selection”or pressing the Ctrl + Click the path (for Windows) & Cmd + Click the path (for Mac).
- Then turn the selection into a new layer by clicking Ctrl + J (Win), or Cmd + J (Mac).
- Finally make the another selection by Ctrl + Click(win) or Cmd + Click(mac) the thumbnail of layer from layer panel
-
Step #3. Open Liquify Tool
- Go to the top of the Photoshop workspace.
- Click on Filter > Liquify. (Press Shift + Ctrl + X (Windows) or Shift + Cmd + X (Mac))
- Adjust values like density, size, intensity, and pressure depending on the requirements. One can get these properties from the right panel.
-
Step #4. Start editing with Forward warp Tool
- Select Forward Warp Tool. This is an ideal tool to modify facial functions that makes the edited image look 100% natural.
- Click and drag around the areas you want to slim down. Ensure you don’t overuse this tool, or else the photo will start appearing fake.
- Select Forward Warp Tool. This is an ideal tool to modify facial functions that makes the edited image look 100% natural.
-
Step #5. Add a New Layer
- Lets adds some noise and subtle texture to the face since you have reshaped it. The addition of noise and texture will bring realism to the face.
- Press Shift +Ctrl + N (Windows) or Shift + Cmd + N (Mac) to add a new layer.
- Fill this new layer from Edit > Fill, and edit the fill settings from the new window that will pop up. You can set the Fill parameters to 50% gray and 100% opacity.
- Now add some noise to the layer from Filter > Noise > Add Noise.
-
Step #6. Refine with Blur Tool to soften the harsh edges
- From the top of the screen, select Filter > Blur > Gaussian Blur and choose the radius and strength of the blur. Always remember, the bigger the radius you choose, the blurrier the image will appear.
- Change the non-linear Gaussian Blur filter to Linear Light mode. This will replicate the texture.
- Reduce the opacity by 30-40% for added realism.
- From the top of the screen, select Filter > Blur > Gaussian Blur and choose the radius and strength of the blur. Always remember, the bigger the radius you choose, the blurrier the image will appear.
-
Step #7. Create a Clipping Mask
- Select the topmost layer that has the texture. Right-click on Layer > Create Clipping Mask.
- Now, the retouching artist needs to add shadow to the image. This brings a more realistic appearance to the edited photo. To do that, the curves adjustment layer needs to be created.
- Go to Layer > New Adjustment Layer > Curve
- Select a control point that you want to darken and start dragging the curve down slowly.
- Stop at a point you feel is perfect. Now add a layer mask. Select Image > Adjustments > Invert to fill the layer with a black shade since it will be white by default. (Ctrl + I (Windows) or Cmd + I (Mac)).
- Now start creating shadows on the chin and neck area of the subject.
- Select the topmost layer that has the texture. Right-click on Layer > Create Clipping Mask.
-
Step #8. Lighten some areas
- Similar to Step #7 (above), create the adjustment curves once again, but drag up the curve control point instead of down. This is for creating a perfect light balance in the image.
- Start lightening the areas you want to, except the neck and chin portions.
- Similar to Step #7 (above), create the adjustment curves once again, but drag up the curve control point instead of down. This is for creating a perfect light balance in the image.


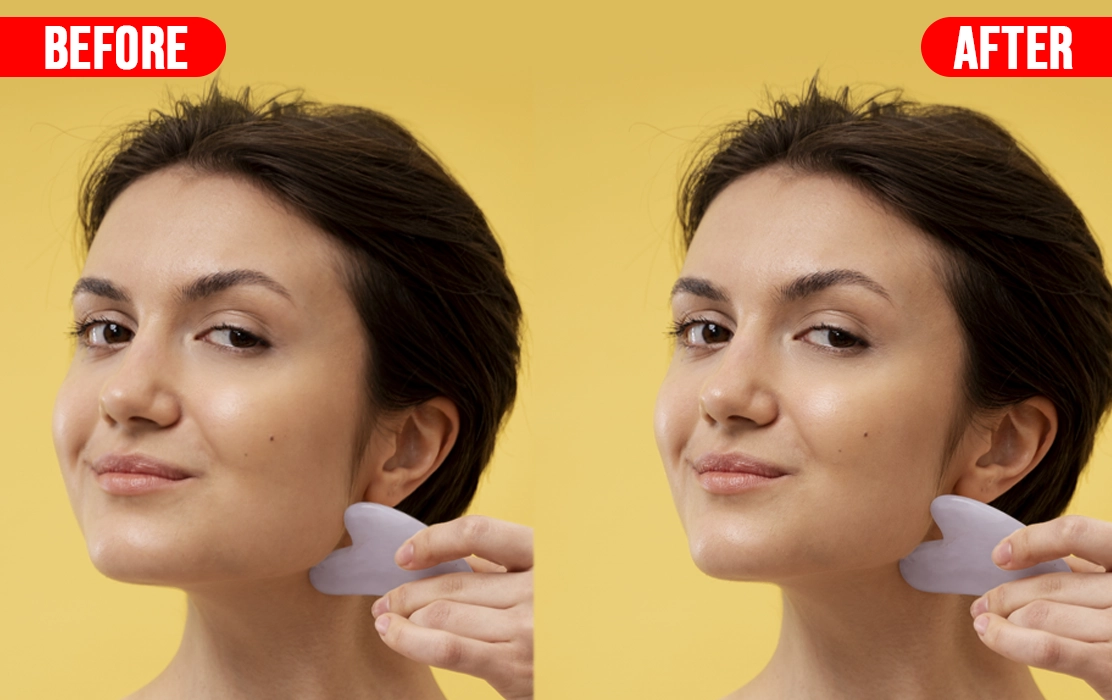
Once you are done with all the edits, click on Save.
That’s pretty much it. These 8 easy steps meticulously explain how to get rid of double chins from a photo in Photoshop. Just remember, don’t overdo the edits and go overboard. Else the finally edited image will look too unreal. Understand when you should make the edit and when you shouldn’t. Your workflow must not make the subject unrecognizable by any means.
Conclusion
There you are! Eight quick and easy steps on how to fix double chin in images using Photoshop. We have tried to simplify the steps as much as we could. Hope you like this Photoshop double chin removal guide and try it yourself.
Fixing double chins in images is a handy skill to possess, as people are conscious about their physical appearances. So even if their photographs make their faces look heavier, a photo retouched can easily remove a double chin in Photoshop.
We believe by following these steps, novice photo retouching professionals can easily remove face fat in Photoshop. If you still need a further helping hand, reach out to a team of experts. Several professional companies are there that offer outstanding photo editing services at reasonable costs and a fast TAT. Collaborate with such a team and offer flawless Photoshop services to your clients.