A Detailed Guide to 3D Textures
We often see how intensely hyper-realistic video games and animated movie characters appear onscreen. The wrinkles on their skin, the scars, natural spots, and dents - everything appears so natural. Some characters appear so real that one can almost touch them. This advanced detailing level is developed by adding textures to the models that are organic.
A 3D artist might create realistic models with proper lighting and accurate dimensions. But it is the textures that give the digital models a lifelike and attractive appearance. With realistic textures, 3D professionals can add depth, intricate details, organic features, and so much more. In short, for any character to look 100% natural, high-quality texture mapping is imperative.
What are 3D textures?
3D textures are square bitmap images that contain information in 3D format instead of 2D. These are usually applied to 3D models to generate volumetric effects and add detailing. Textures act like skin that is wrapped around the skeletal frame of a model, giving it a realistic, organic look. Every character we see in modern games or animated films is made with these textures.
The bitmap images are intended to repeat, to make them lay over a model seamlessly. With the right quality of texture, 3D characters get their color, effects, and pattern and become palpable.
Types of textures
-
Normal maps
Also called bump maps, these textures give a bumpy and smooth appearance to the model’s surface, keeping the shape intact.
-
Diffuse textures
These types of textures are used to define color in the model.
-
Ambient occlusion maps
These are applied to create shadow effects that make the 3D object look real.
-
Specular maps
These textures make the model’s shininess more intense, representing the amount of light reflected.
-
Roughness maps
These textures define how the light interacts or scatters along the model’s surface.
-
Opacity maps
These are usually grayscale or single-color texture maps, representing the Alpha channel or A part of diffuse maps. These are used to make some areas opaque and some transparent.
-
Height or displacement maps
These textures alter an object’s geometry to showcase the more intricate detailing of the object. These texture maps must ideally be baked before using them on a 3D model for web purposes.
-
Metalness or metallic maps
Metalness maps are grayscale maps that simulate real-world metallic shine on a 3D surface, using black and white values.
What is 3D texturing?
3D texturing is the software-generated process of adding surface detail to a pre-made 3D model. It can be explained simply as wrapping a 2D image around a 3D model to give the latter a realistic look and feel. Adding textures also defines how the light source will affect the model. For example, the model’s surface will reflect light.
In an animation or 3D design pipeline, texturing or texture wrapping plays a key role. The process adds shine to a metallic surface, gives a rough, edgy look to a brick wall or furry surface, gives a glossy effect to glass objects, and so on. The objective is to flawlessly reproduce the surface properties and color of the model to make it look believable to the audience.
Simple tips for creating photorealistic 3D textures
How do you make realistic textures for 3D models? Let’s find out the tips that will help!
-
Refer to sample images
There’s no harm in referring to sample images or references to get clarity. Obtaining clear references and referring to them is one of the most useful tips for creating 3D texturing. One may find references on the Internet, in books, and in other printed materials.
They can also take a snapshot of the reference. Analyze the reference(s) inside out. See how the light and shadow interact with the materials. In 3D, one of the fundamental aspects is light. If you get the light correct, half the work is done.
-
Add imperfections for a real-world feel
No organic material appears 100% flawless in the real world. However, in some 3D artwork, we see things made too perfect, far from being real. This not only makes the model or the character look artificial and fake, but also ruins the beauty of texturing.
Therefore, add some subtle variations to the textures. Incorporate subtle chaos and break the repetition. A good point to start with is by using brushes, masks, stamps, etc. Add procedural or “Perlin noise” to give the texture a wear and tear or stain effect.
Texturing artists can also use layers, blend modes, and filters to modify the HSL (hue, saturation, and lightness), contrast, and color scheme of the surface texture.
-
Using more PBR material textures is a great idea
PBR (physically-based rendering) materials are virtual material pipelines composed of several texture maps. These materials can simulate any physical material, thus improving the appearance of the model. PBR materials define the exact roughness, color, pattern, metalness, normal, and other such attributes.
Applying PBR textures to a 3D model increases its efficiency under different lighting and environments. PBR materials are available online for free; some paid versions are also available. Also, one may create custom materials by using top-rated software like PBRtist, Substance Designer, Quixel Mixer, or Material Maker.
-
Utilize displacement maps in your textures
Displacement maps create accurate 3D geometry, creating an organic shadow appearance. The best part of these maps is that they don’t increase the poly count. Displacement maps shift the model’s surface, which is either raised or lowered on an up/down axis based on your selected texture.
So, as tip number 4, try to utilize displacement maps to make your texture appear more realistic and highly detailed.
-
Try using a mix of different textures
This might sound silly, but in reality, this is a lifesaver. You cannot expect the same texture quality for every different part of your 3D model. Especially if it is an entire 3D environment with multiple elements.
To make each element look lifelike, it’s important that the artist use different textures. But ensure the textures do not overlap each other. Assign a specific material ID to each separate section during the mesh creation stage. You may use one map for bump, one for color, and another for shadow or shine.
-
Incorporate texture baking maps
Texture baking transfers texture data from a high-poly model to a low-poly one. The texture data contains lighting information for 3D environments and CGI. This improves render performance and significantly enhances realism. As well, the hardware memory is saved.
Normal maps, curvature maps, ambient occlusion maps, height maps, bump maps, light maps, etc., are some of the common maps 3D artists can bake.
-
The right resolution matters
With the right texture resolution, a model’s realism and clarity are enhanced. To achieve flawless, optimum quality, evaluate the distance and size of the models from the camera’s perspective. Getting the perspective aligned perfectly is much needed; otherwise, the object will look fake.
Also, consider the performance of the rendering engine or the modeling software. The last aspect to ensure is the theme and style of the project you are working on. Often, even a low-resolution texture can work perfectly without the need to stretch or scale it.There are plenty of online tools that can help you optimize the texture quality and file size.
-
Don’t fear to experiment with various materials
Just like using multiple texture maps, experienced 3D professionals also play around with different materials. Experiment with different materials until you attain the exact desired look.
Use different materials like bubble wrap, cellophane, foil, feathers, sandpaper, plastic, and so on. Each of these materials can reflect light differently. Use them as your project theme calls for. This is probably one of the most practical tricks for effective 3D texturing.
Benefits of applying 3D textures
The usage of high-quality 3D textures has dramatically transformed the world of computer-generated imagery. 3D artists can replicate more natural-looking character graphics and 3D scenes for animated movies and computer games. Besides enhancing the visual quality of a 3D model, below are a few more benefits of 3D textures and why they are important in 3D designs.
-
Add a touch of realism
Textures, especially PBR textures, simulate real-world physics-based lighting. This is a game-changer for modern visualization, as we see in entertainment and eCommerce. By applying textures, artificially generated 3D models get an authenticity.
Thus, the final rendered image or animations appear more photorealistic to the audience.
-
Simulate organic surface imperfections
Textures are best for creating strategic imperfections or dents on an object’s model. This adds to the realism of the model and makes it more acceptable to the viewers. Imperfections such as wear and tear, sense of age, finger stains, etc., increase the storytelling capacity of the digital models.
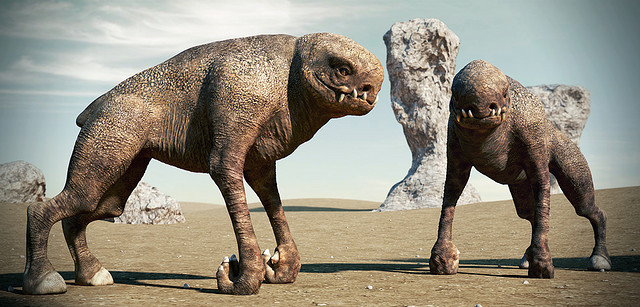
Can transform quirky CGIs into organic beingsWith textures, highly nuanced 3D movie artists transform software-generated unique characters into real-world beings. For instance, they can develop a 3D model of an extraterrestrial alien or an imaginary entity, and then give it shape using high-fidelity textures. This is immensely vital to the 3D movie industry.
-
Communicate subtle details
Textures are integral to conveying subtle details of a character to the audience. Whether the character is worn off, fatigued, angry, or emotional, all these can be conveyed through natural-looking facial textures.
Also, for describing inanimate objects like smoothness, glossiness, metallic shine, wooden surfaces, and coarse or abrasive material, textures are critical.
-
Enhance the efficiency of CGI artists
Simulating accurate real-world details through computation is not only difficult, but is also time-consuming and expensive. The overall modeling process also becomes slower, replicating the intricacies by modeling individual parts or through scripting or coding.
Lastly, the textures developed in these methods do not always turn out to be authentic. On the contrary, adding textures or texture mapping is a much easier and more convenient process. It improves accuracy and is also a practical industry-standard method given project urgency.
Software for creating natural-looking textures
Regardless of the size of your model or the project scope, you must get your textures correct. There are no set guidelines for creating 3D textures. But in order to get appropriate textures, the first and foremost requirement is selecting the right software.
Professional 3D artists and CGI specialists use special, high-end tools for the process. That’s why the textures created by professional agencies look so well-made. Moreover, professional 3D design services agencies have valid licenses for software programs that strengthen their workflow.
In case you want to try texturing for yourself, check out these ten professional software programs.
Best sites to get free 3D textures in 2024
As more 3D artists leverage the potential of 3D textures for their artwork, several sites have come up with usable ready-made textures, free for use. The entire 3D fraternity made of texture developers is behind these amazing pre-made textures that anyone can add to their repository.
Let’s check out some of the best websites where you can get custom-created textures.
-
Archive Textures
Archive Textures offers more than 25,000 free usable 3D textures. These bitmap textures are handmade by several indie texture artists and 3D professionals. Simply download them and start your texture mapping process.
-
ShareTextures
Featuring over 1400 free textures, with new ones added frequently. All of their textures are under CC0 license, which enables anyone to use the textures freely. A bunch of highly talented architectural visualization experts are behind these textures, making the site ideal for architectural modeling workflows.
-
SketchUp
SketchUp is one of the leading sites to get premium-grade textures for free of cost. With 20,000+ accessible textures and 46 PBR textures, SketchUp is the best place you have if you want to get started. It allows 15 free downloads each day.
-
All3dfree
Just as the name suggests, All3dfree is a handy website for quick, accessible 2D/3D textures. The website has a vast range of texture styles; from coarse brick patterns, to aesthetic Renaissance themes.
-
3DXO
3DXO has a decent interface and a fair number of free textures. It is ideal for amateur 3D enthusiasts with shoestring budgets. The search filter in the interface helps to find the textures and download them in image (JPG/PNG) formats.
-
AmbientCG
With over 1200 PBR 3D textures, AmbientCG is a decent find for novice 3D artists. The site provides the textures in JPG and PNG formats. Users simply have to find them through the “Photo Textures” filter.
-
Poliigon
An excellent repository for high-quality free textures, Poliigon is surely a beginner’s go-to choice. Though the website only offers around 60+ textures, they are all PBR and in 8K format. Poliigon also has subscription plans for premium textures.
-
3DTextures
One may find the UI of 3DTextures to be a bit dated. But the textures on this website have a vast range. Such as metal, wood, leather, dirt, etc. Moreover, all the 3000 unique textures are high-quality PBRs.
-
Poly Haven
This website has an amazing repository of around 400 pre-made, highly detailed textures. It also offers high-definition HDRIs, perfect for wrapping around 3D models for lighting and background purposes. Some of the textures Poly Haven offers are roofing, terrain, plaster, floor, wood, etc. Available file formats are PNG, JPG, GLTF, BLEND, and EXR.
-
CG Bookcase
CG Bookcase has a minimal and simplistic user interface that anybody will love. The site is owned by Dorian Zgraggen, a professional 3D enthusiast and 3D model developer. Dorian has single-handedly created 500+ realistic 3D visualizations, PBR textures, and scanned 3D models. CG Bookcase has all the textures organized that can be searched via simple filters and downloaded easily.
Hope this handy list will help any 3D artist to start their workflow. So start and use these in your artwork this 2024 and beyond.
Conclusion
Summing up, 3D texturing is not just another stage in 3D design and animation. But it is one of the most vital and value-added steps. Without adding textures, none of the 3D models and environments can come to life. Thus, it can either make or break a 3D production.
Along with that, creating natural and realistic-looking textures is the ultimate skill 3D professionals must acquire. If a texture looks fake and unreal, your characters will also look robotic and not organic. Hence, accurate texture mapping, correct texture coordinates, resolution, and the right software are crucial.
Therefore, it is always recommended to consult professional 3D service providers for the best results. These expert agencies offer stellar 3D texturing services at highly cost-effective rates. So, get in touch with a specialized team for all your 3D texturing requirements. Start creating more detailed and realistic computer-generated imagery.