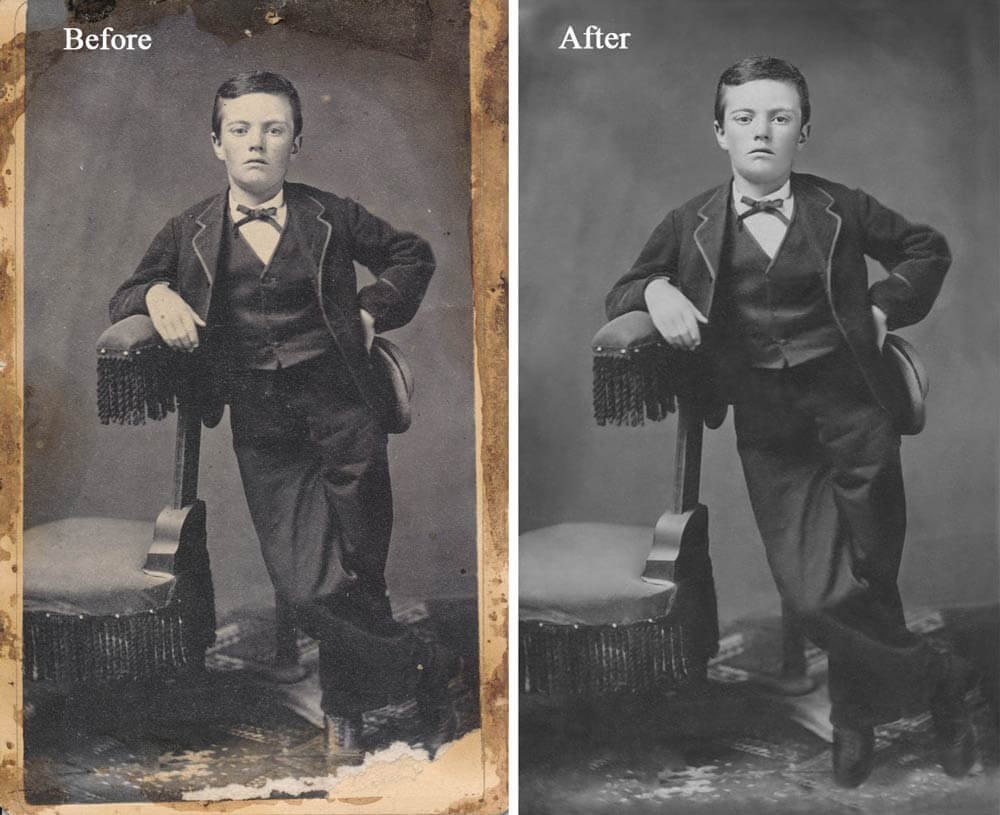
As photos get older, they may fade, crease, speckle or crack. Most of the times, they hold precious foregone moments of life. Preserving them for generations to come is quite feasible these days with adequate photography restoration tips and techniques. People mostly prefer outsourcing their digital photo restoration requirements to any reputed image editing company.
Download PDF format of this article here ! Download
However if you are adept in Photoshop CS5, you can try old photo restoration by yourself. The below step by step instructions and photo restoration photoshop tips can help.
-
Scanning the photograph

Highest possible quality of scanned image is what your primarily require. Make use of a scanner with minimum 300 dpi. In case if you don’t have a quality scanner with you, a great snap of the picture may serve the purpose. The more details you are able to retain the more perfection you attain.
-
Make a copy of photograph
Before proceeding further, assure that you have an original copy with highest quality. This can keep you safe in case of any unforeseen catastrophe. Having a backup helps also when you are planning to experiment with different techniques with the same image.
-
Work with layers
Create one new layer while retaining the original copy and start working on the newly created layer. ‘Eyeball’ must be turned off after locking the base layer so that it is not altered. This standard practice is followed by most of the professional service providers for restoring old photos in Photoshop.
-
Crop, rotate, or straighten as per your needs
Before you start making modifications, kindly adjust the images as per your liking. Cropping, straightening, and rotating are the basic adjustments you can make. Having a clean and oriented image will make the editing process easier.
-
Removing dust and scratches
Now start by removing the scratches and dust using filters. In the option, retain the setting as low so that the details are not lost. Manual removal may be needed but this tip is really effective. Using preview feature will properly guide you.
-
Reviewing the pictures for correction
After you are eliminating the dust and imperfection, review your image. See if it needs any further correction. If you are 100% sure that the present condition of your picture is exactly what you need, you can directly move to the 10th step.
-
Making the required adjustments
This is the next step you need to take if you are not 100% satisfied with your picture’s current condition. Mostly, people face issues with fixing the damaged spots as well as the color.
Photoshop offers a variety of options that can automatically adjust the color, tone, contrast, and overall vibrancy. Similarly, for fixing the damaged spots you can use Photoshop's spot-correct tools like Patch Tool, Clone Stamp, and Spot Healing Brush.
-
Reducing noise in photograph
Remove noise and speckle using the Reduce Noise option from Filter section. Tweak your settings based on the image on which you are working. If it is too grainy opt for filtering at more strength and for lesser specks, reduced filtering is enough.
-
Enhancing old photographs
Further enhancing can be done using spot healing brush and clone tool. In CS5 version, the spot healing brush is more useful and intuitive when compared to the older versions. Clone tool operates well in case if you have to repair larger areas. While operating, keep your image well zoomed so that no details are missed.
-
Final step for photo restoration
Now again create a new layer from the layer on which you worked. Lock the previous one and this will save all the changes done. On the new layer just created, try adjusting contrast and brightness. Give the final touch up.


Conclusion
TThe above steps showing how to restore antique photos in Photoshop are applicable only when there are least complexities involved. If the images are badly tarnished, seeking help from professional photo editing services provider is the best choice you can make.
Before committing, ask for a free sample done for you. Most of the professional companies offering image restoration services will be happy to avail you a no-obligation with free restoration sample.