Changing hair colour is one of the most frequent demands encountered in fashion photography and the time consumed for this process when done practically takes a lot of time. What is the apt alternative for this? How can you spare time and be safe from shedding an excessive amount of dollars?
With technology growing each day, wiser ones are those who make optimal utilization of it. Embracing the services of image masking and editing from expert companies can help in eliminating the above-said issues.
By using advanced software programs like Photoshop, you don’t have to suffer the discomfort of waiting for your models outside the make-up room, each time when the changing of hair colour is needed. When you rely on the services of professional companies, define your requirements regarding image editing well in advance.
However, you can also do this changing hair colour using Photoshop in a perfect and realistic manner by following the below three steps.
-
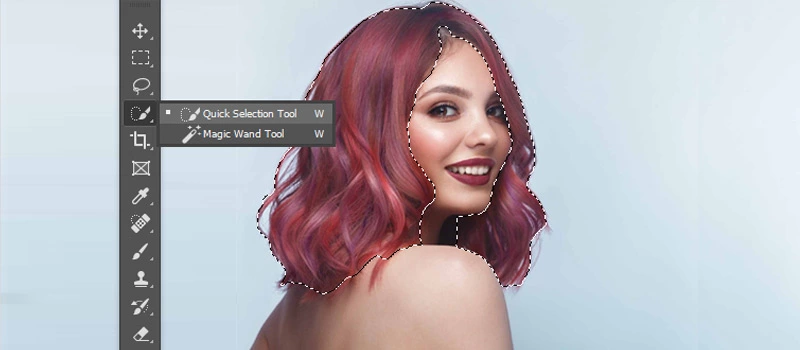
Hair masking
![Hair masking]()
Masking hair is quite easy with the Quick Selection tool; most photo editing professionals prefer it. Just open the concerned image that has to be edited and then from Tool Palette, select Quick Selection option. You may change the brush sizes as needed. Then use selection brush for selecting the hair and if selection exceeds than needed, CTRL key can be used for reducing the area. After selecting, click the Refine Selection Button.
-
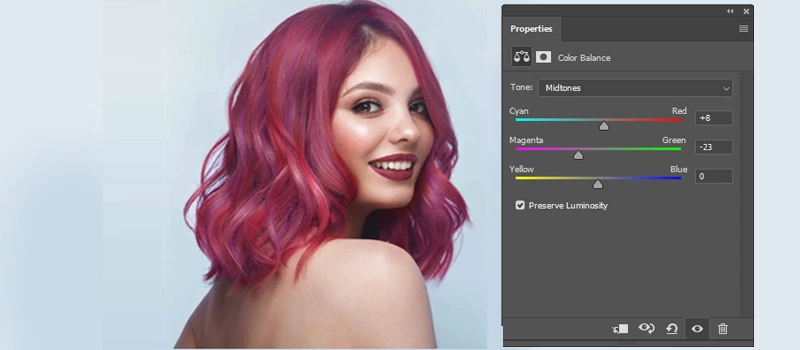
Colour creation
![Colour creation]()
Firstly proceed to Layers Palette. Using the colour Balance adjustment, make an adjustment layer. You need not click on the photo thumbnail. Press CTRL and click simultaneously on the layer mask thumbnail for getting selection on your photo. At the bottom part of layers palette, click the Adjustment layer icon for creating a new adjustment layer. Now, from pop-up menu, you can select the Colour balance. A new adjustment layer- can be seen. By clicking on scales icon thumbnail, colour balance layer can be activated. You will be provided with sliders that will enable you to create the hair colour.
-
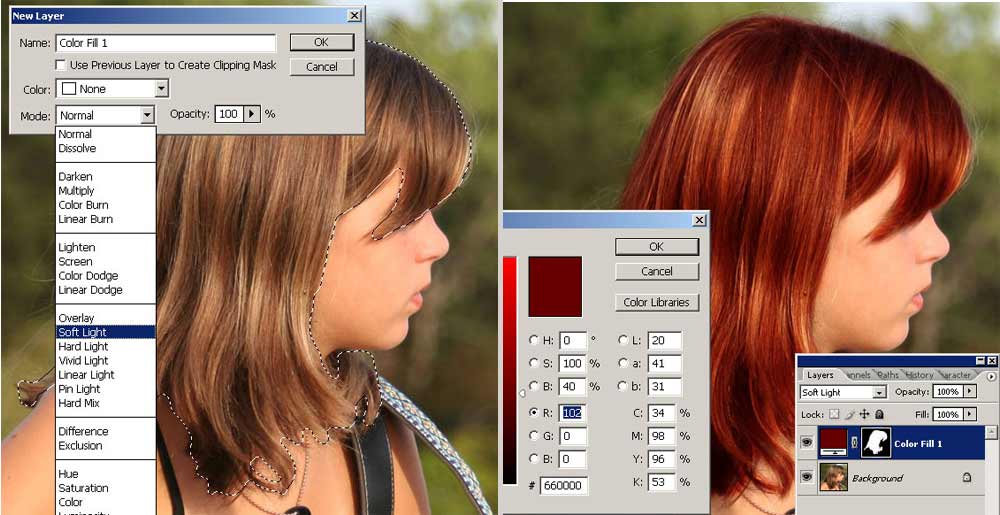
Modes and opacity blending
![Modes and opacity blending]()
Now adjustments of fine details can be done and most image masking companies have professionals capable of assuring that the new colours never seem unrealistic. They know to perfectly adjust the modes and opacity to suit the client’s requirements. Metallic looks can be obtained by using HUE blending mode with 75% opacity. For getting bolder looks, you may try SOFT LIGHT or SATURATION.

In general, there’s a list of Dos and Don’ts that you should follow while performing general photo retouching in Photoshop or while performing photo color correction:
- Don’t rely completely on the clone stamp tool. Using this tool too much may produce ugly results. It is a good idea to opt for a soft brush and lower opacity in most of the cases.
- Make use of the History brush. This would help you fix over-blurring effects. Prevent Undos and save time by capturing incremental shots in the History palette.
- The Gaussian blur cannot perform a clean work every time. If used improperly, it would generate a mannequin-type appearance. You can instead use the Median option for a clean effect.
- Use the pen tool to create a smaller sampling. In fact, you should use the Pen tool to select odd-shaped portions.
- If you are a beginner, the Elliptical Marquee tool and the Quick Selection tool are great options for you.
- Use the ‘Refine Edge’ button for additional effects.
- Adjust the brightness and contrast as well as perform selective color adjustment.
- You should save during the iterations.
- You should lock the layers while working on several layers.
- Perform editing in the RGB mode rather than in the CMYK mode.
- Set a name for each layer if you have to work on multiple layers.
There are several ways to change the color of your hair in Photoshop; the steps listed above are just a few of them. Photoshop is a technological wonder for photo editors, given its numerous tools. So keep on experimenting and see what produces the best result. Also, while changing hair colors, keep the subject’s skin tone in mind, as certain shades do not go with the natural skin tone of most people.
Make your color selection aesthetic, suggest your client what will look best on them, get the ideal Photoshop tool, and start the work. Hope this quick tutorial has been able to spark your creativity. Let us know if you want to learn more about changing skin or eye color in Photoshop. We are one of the best image editing service providers, and we have experts on our team who can impart valuable knowledge to all beginners.