Have you ever wondered how photos like this are created?
The answer is Clipping masks! But before moving to that, let’s have a quick recap about layers in Photoshop, as clipping masks lets you play with them!

Long story short- Layers let you modify the original image without affecting it. They are like blank transparent sheets created every time a new change is to be made to the original picture.
What are clipping mask?
Clipping Mask is a photo editing technique which enables users to apply various adjustment layers, one above the other, to get the final and desired look by grouping them together. In this group of layers, the boundaries of the bottom-most layer defines the boundary of the entire group.
For instance, you want to create an effect by putting an image in a see-through manner in the background of a text or a frame. You can do so through Clipping Masks by creating separate layers for each, controlling the visibility of the layers, and finally grouping them together.
The text which is on the upper layer will let only the masked parts of the image, which is in the lower layer, be visible through it. In Photoshop, a clipping mask can group multiple layers and give you the desired effect. But always remember, you can use this feature with a minimum of 2 layers.
Hope you got a preliminary idea of what clipping masks are? Now let’s move on to the main topic under discussion. This might make the concept more vivid!
How to create a clipping mask in Photoshop?
Clipping masks are pretty simple to create and use. To create an ordinary clipping mask or a group of only two layers follow the steps below:
- Step 1: Out of the two layers, name the layers for your own understanding. Let’s name the first layer as “Image” and the next layer as “Shape”.
- Step 2: Select the layer that is to be masked from the Layers panel. Here, the “shape” layer will mask the “Image” layer. So we’ll select the “Image” layer.
- Step 3: Go to Layers option in the Menu bar.
- Step 4: Choose Create Clipping Mask.
- Step 5: Adjust the image as per your needs to get the desired effect.
How to remove the clipping mask?
If you want to change the image or the shape or are not very happy with the result, you can choose to release the clipping mask. For this you will have to:
- Step 1: Select the layer from the Layers panel.
- Step 2: Go to the Layers option in the Menu Bar.
- Step 3: Choose Release Clipping Mask.
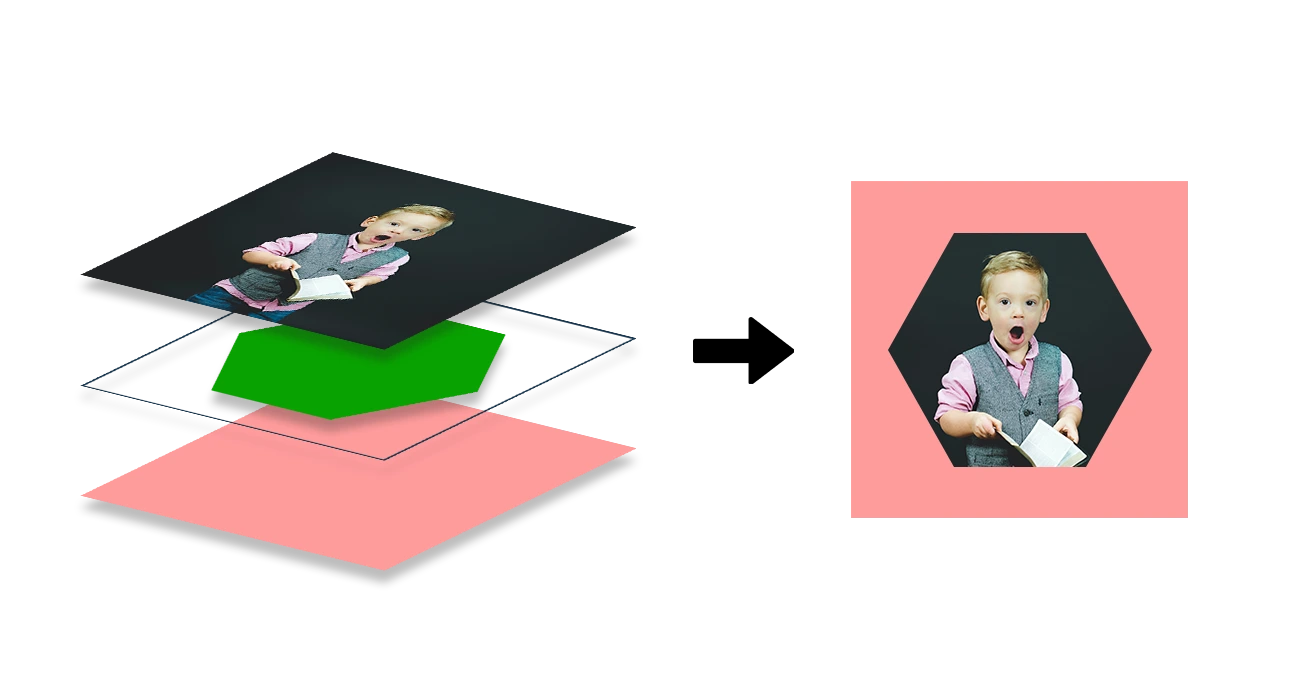
To use a clipping mask for creating the first picture which is shown, follow the steps.

- Step 1: You need to create 3 layers instead of 2; a layer for the base color, a layer for the text and a layer for the image.
- Step 2: As the image is going to be seen through the text, the text layer must be below the image layer. So the order goes as first layer: the base color, second layer: the text and the third layer: one with the image.
- Step 3: Select the layer from the Layers panel which is to be masked.
- Step 4: Go to Layers option in the Menu Bar.
- Step 5: Choose Create Clipping Mask.
Clipping mask vs. layer mask
Clipping mask and Layer mask are both masking techniques offered by Adobe. They both perform the same function, i.e., masking parts of the image but work very differently.
- Clipping masks can work on multiple layers, but a layer mask can work on only one.
- Clipping mask uses a “shape” to hide the parts of the image underneath. Only the parts of the image which fall within the shape are visible, and the rest is masked. A layer mask makes only the selected pixels visible, and the rest is masked.
- The mask is applied to the layer itself in the layer mask, i.e., a single layer but in the clipping mask, the mask is formed by connecting two layers.
- Layer mask makes changes in one layer by changing the transparency level of any part of the image in it. In contrast, a clipping mask controls the level of transparency of one layer based on another layer.
Which fields most frequently utilize the clipping mask service?
Images are utilized to the core for making brand names prominent in the market. They are used for various purposes in a variety of fields by leveraging the photo editing techniques. Clipping mask is one of those photo editing tools which is simple to use but yields amazing outcomes.
Sellers in various fields make use of the clipping mask and clipping path services for making huge sales online. Some of the field reaping maximum benefits of these services are:
- Garments industry
- Jewelry
- Automobile industry
- Real estate business
- Food photography items
- eCommerce items like electronics, toys
- Interior decoration items
Conclusion
Clipping mask is a wonderful way to conceal parts of an image without removing them. It is evident that clipping masks are a crucial component of editing in Photoshop and have a wide range of uses and clipping path made effortless using tips and methods. Also, whether anyone deals with photo collages or graphics, users will find them particularly beneficial.
The most important thing is to find reputable photo editing service providers that can provide you with the highest level of service at an affordable cost. Budgets for various clipping path and masking approaches vary. So, you must select a legitimate and trustworthy clipping path services company based on your requirements and budget.