We all know that every beautiful picture is not limited to the art of photography. Nature is beautiful, but sometimes the photographers do not get the required exposure, scene or situation while taking the photos.
So to get the shot they exactly imagined while clicking the photograph, they polish it through photo editing software. Besides adjusting other parameters, the objects not required in the frame are removed too.
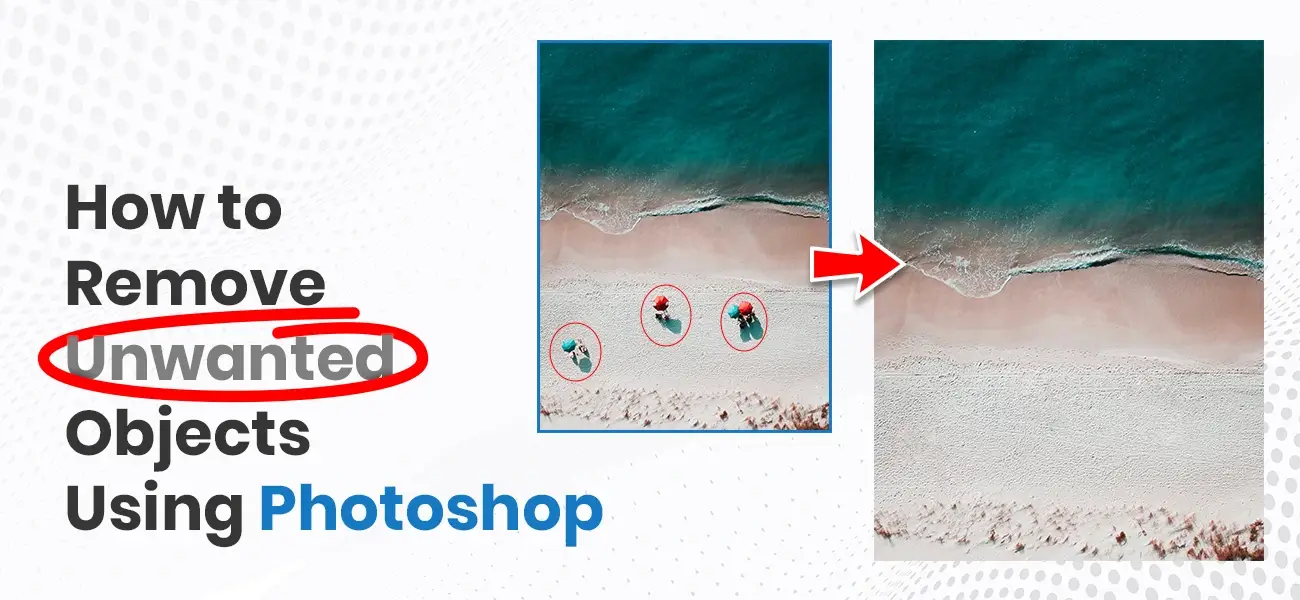
This blog will tell you how to remove unwanted items from a photo in Photoshop. So keep scrolling!
The importance of decluttering your images
The unwanted objects destroy the focus of the original subject of the image; it even makes the photo look clumsy. Decluttering services using Photoshop is possibly one of the best and easiest ways to get rid of unwanted items that too with a professional finish.
Object removal is very useful for removing unwanted trees, bushes, animal figures from wildlife photographs, lamp posts, wires, kitchen and household items from real estate photos, human figures in the background from a candid shot, and much more.
Tools in Photoshop to remove unwanted objects from a photograph
-
Spot Healing brush
Spot Healing Brush - Removing Unwanted Objects using Photoshop Tools The spot healing brush tool is Photoshop’s healing tool by default that has multiple usages, and is used by professional photo editors worldwide. The tool works great to remove isolated dust spots or facial blemishes, clone certain areas from a photo, or blend the pixels between the sampled spot and the target spot.The Spot Healing Brush can be used to remove very small and finer objects like blemishes, spots, acne, fine lines, small scars on the skin, wires, wire fences, dust spots, scratches on the car surface, and similar things.
The tool works by replicating pixels from certain areas of the image and blending them with the target area so as to give a smooth finish. Spot healing brush is pretty simple to use and works specifically in case of minor error corrections in an image.
- Define the layer(s) by selecting the Duplicate Layer option by right clicking
the current layer from Layer panel.
(Note: Layer saves your original image from changing entirely by letting you work on the changes one at a time.) - Go to Tools option
- Click on the Spot Healing Brush Tool
- Adjust the size and hardness of the brush according to the dimensions of the object that is to be removed.
- Click over the spot or click and drag over the object if it is long.
- Define the layer(s) by selecting the Duplicate Layer option by right clicking
the current layer from Layer panel.
-
Healing brush
How to Remove Unwanted Objects Using Photoshop - Healing Brush Tool The healing brush tool is a favorite tool of photo editing professionals owing to its versatility and usefulness. Located on the left side of the Photoshop Toolbox, the healing brush tool fixes imperfections around the selected area, then “clones” or blends the pixels to another part of the image.The Healing Brush does the same job as Spot Healing Brush but with one slim difference. Unlike in Spot Healing Brush Tool, you need to define a source (the area in the image with which you want to replace the target area) in Healing Brush Tool.
This tool lets you manually define the part of the image from where you would like to replace the pixels and repair the image. The Healing Brush tool somewhat comes into play when you feel the need to add more precision to the image, even after using the Spot Healing Brush tool.
- Go to Tools option
- Click on the Healing Brush Tool
- Choose the area on the image you want to replace your target area with.
- Press Alt key for Windows or Option key for Mac.
- Click and release the mouse button for a spot or drag in case the object is long.
-
Patch Tool
How to Remove Unwanted Objects Using Photoshop - Patch Tool Photoshop The patch tool is another go-to tool for photo editing and post-processing professionals to remove large blemishes, spots, and distractions from any photo. It is like a giant healing brush tool, categorized under the spot healing brush tool set.The Patch Tool is used when the correction areas in an image are too large. This tool is very useful for repairing images with unwanted human and animal figures, trees, buildings, or any large object which causes distraction to the main subject.
The Patch Tool differs slightly from the Brush tools, although the major function is the same. It lets you select the portion of the image you want to fix by drawing a shape around it so that it doesn’t touch the other parts of the image.
After which, you drag the selected portion to an area with a similar background. The object disappears, thereby fixing the image.
- Go to Tools option
- Click on the Patch Tool
- Select Normal and choose Source option. You can also choose Destination if you want to duplicate any part of the image.
- Draw a suitable shape around the object you want to remove. This is to define the selection.
- Now drag the selected area to the part of the image with the similar background as the object.
-
Clone Stamp
How to Remove Unwanted Objects Using Photoshop - Clone Stamp Tool The clone stamp tool in Photoshop is ideal for removing unwanted objects and imperfections from any photo by pixel duplication. The clone stamp tool is relatively easy to use compared to the other Photoshop tools and is also extremely intuitive, giving the user greater control over their work.The Clone Stamp tool is used when you are trying to hide any unwanted object in your photo. It lets you copy a part of the image with which you would like to hide the object and seamlessly eliminates the object by hiding it.
From the name itself, the Clone Stamp Tool ‘clones’ or copies a part of the image and ‘stamps’ or pastes it on the target area. The Clone Stamp tool is highly useful for hiding undesired items in a photo like buildings or wires in a beautiful sundown picture.
- Go to Tools option
- Click on the Clone Stamp Tool
- Choose the area on the image you want to replace your target area with.
- Press Alt key for Windows or Option key for Mac.
- Drag the selected area to the part of the image which is to be hidden.
-
Content Aware Fill
How to Remove Unwanted Objects Using Photoshop - Content Aware Fill Tool Photoshop‘s content-aware fill tool is amazing for post-processing for professional editors and photographers as it greatly reduces the editing time for editing photos containing complex objects or lots of unwanted components. The tool gives ultimate control to the user and is powered by an advanced algorithm. Thus, the tool is highly intuitive.The Content-Aware Fill is a handy tool for unwanted object removal. It does the work of figuring out the pixels on its own rather than making you manually select the pixels. All you have to do is draw a selection area around the object to be eliminated, and the Content-Aware Fill Tool will do the rest.
This tool works by analyzing the part or “content” of the image it will use on the target area. It gets the pixels that best matches the target area to replace it with. This is why the Content-Aware Fill tool is perfect, with images with consistent colors throughout.
- Select the object that you want to remove. Choose the selection tool based on
the dimension of the object that is to be removed.
(There are many selection tools available in Photoshop like Lasso, Magic Wand, Object Selection, etc.) - Click on the Edit option
- Click on Content-Aware Fill
- Click on OK if you got the desired result.
Note: Generating layers while using every tool helps you by saving the original image. It’s always recommended to create or duplicate layers before using any tool.
- Select the object that you want to remove. Choose the selection tool based on
the dimension of the object that is to be removed.
Healing Brush vs. Clone Stamp
Both the Healing Brush Tool and the Clone Stamp Tool let you choose the source area. But the main difference between the two is that Healing Brush Tool tries to blend the chosen pixels with the surrounding pixels of the target part, whereas the Clone Stamp Tool creates exact copies of the pixels of the source area and places them on the target area.
The beautiful photographs we see around, be it of wildlife, underwater, nature, wedding, portrait, or even about business, are often congested by unwanted objects. Highly skilled photo editors perform this object removal task seamlessly.
Conclusion
You have reached the final segment of our comprehensive article on removing unwanted elements from an image using Photoshop. Hope the tools mentioned will help you declutter an image perfectly, bringing out its beauty. Start using the tools and keep experimenting. While you carry out your editing workflow, you might notice that one tool is more effective than the other.
So, clear all doubts before you sit down for the photo post-production process. Which tool will give you the best results, that can only be determined after experimenting with each one of them. So start the process today and achieve a high level of perfection.
In case you find it overwhelming to edit hundreds of photos within a fixed deadline, contact a professional photo editing service provider. They can work on multiple projects together and provide the utmost quality.