Capturing the “picture-perfect” photo that wows everyone is not just about expensive DSLRs. Instead, it is mostly striking the right balance between light and shadow. Speaking of which, the camera exposure plays the main part in achieving this balance. Hence, whether you are a novice or an intermediate in photography, mastering exposure is your first priority. Hope you have understood that this article is all about mastering the art of camera exposure and elevating your photography skills.

As it is known, exposure is the cornerstone of photography. It influences all the aspects of a photo, from brightness and darkness, to minute details and vibrant colors. No matter whether one takes a photo from their smartphone or DSLR, understanding the fundamental concept of exposure is crucial. So, embark on an exciting journey to unravel the basics of camera exposure and create stunning photographs that capture your vision.
Let’s begin!
What is exposure, and how is it important in photography?
Exposure in photography is the amount of light that travels to your camera sensor from a light source when you capture an image. It is a fundamental concept that determines how bright or dark the generated image will appear. The primary goal of exposure in a camera is to create a photo that accurately represents the physical scene’s natural lighting and details.
Maintaining the right exposure is a work of art. Under-exposed photos appear too dark, and over-exposed images appear too bright and faded. To achieve a rightly balanced exposure, three key elements are involved: aperture, shutter speed, and ISO. We will discuss these critical components in further detail in the following sections.
Now, if you wonder why exposure is so crucial while taking photos, it is because it directly impacts their visual qualities. It mainly impacts detailing, brightness, and contrast. Check out a few reasons why photographers consider exposure to be extremely essential:
-
Aesthetic expression: Whether aesthetic or artistic, a photographer’s vision must always evoke a sense of emotion. Proper exposure adjustments help photographers creatively interpret a scene. By adjusting between over- and under-exposure, they can create an airy, moody, or dramatic atmosphere.
-
Technical precision: Having a fluent knowledge of camera exposure allows photographers to make informed choices based on the available lighting conditions. This technical know-how is paramount, especially in challenging lighting scenarios where light is scarce. Such as night photography, backlit scenes, or where the subject is illuminated from behind.
-
Post-processing flexibility: Images that are exposed in a balanced way are easier to edit, expediting post-processing. Over- or under-exposed photos are difficult to correct as editing can degrade quality to some extent and introduce noise.
-
Consistency: Mastery of photo exposure also ensures photographers consistently produce well-exposed images, regardless of the shooting conditions. This consistency is pivotal, especially for professional photographers, who require high-end results to cater to their clients.
To sum up, exposure is the backbone of photography. It influences both the technical aspects, as well as the artistic nuances of any image. Thus, understanding it and being fluent in it are mandatory for all photography enthusiasts.
Let’s move on to the next phase, where we will discuss the key elements of camera exposure and how they work in tandem to produce impressive results. Keep scrolling.
Key elements of camera exposure and how do they work together to generate properly exposed photos
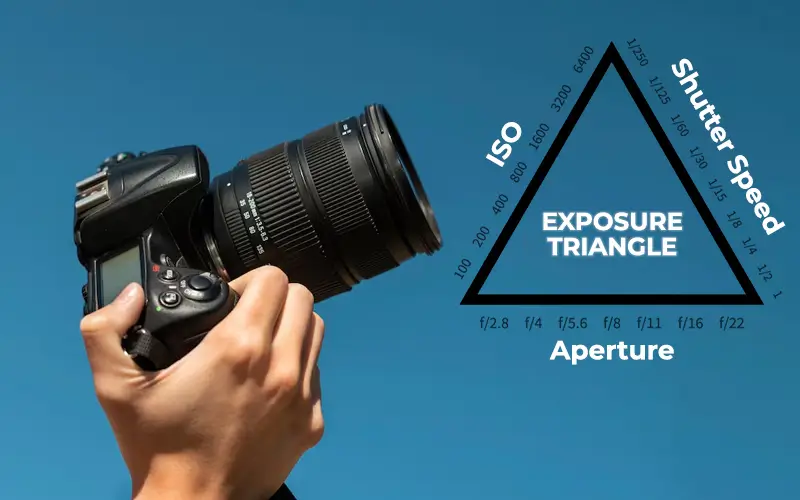
As mentioned earlier, three fundamental elements are involved in achieving an optimal level of exposure. They are aperture, shutter speed, and ISO. These elements are often termed “exposure triangle” and work together simultaneously to control the amount of light entering the camera sensor. That said, learning more about them is essential. Check the details below.
-
Aperture

The aperture is the small opening in the camera lens through which light enters the camera sensor from the light source. It is similar to the pupil of our eye, which widens or narrows to control the amount of light passing through. Aperture is usually measured in f-stops, i.e., f/2.8, f/4, f/11, etc. The lower f-stop numbers denote larger apertures, letting in more light. Whereas the higher f-stop numbers correspond to smaller apertures, allowing less light to pass.
For example, if someone wants a bokeh effect in a photo, a large aperture of f/2.8 is needed. While a landscape photo where everything must be in focus, f/16, which is a smaller aperture, is to be used.
Another aspect of the aperture is that it also affects the depth of field, implying that the distance range between the farthest and closest objects within a photo appears acceptably sharp. A smaller f-stop (larger aperture) creates a shallow depth, resulting in a blurry picture that isolates the subject. On the other hand, a larger f-stop (smaller aperture) creates greater depth of field, keeping more objects in focus without losing image quality.
-
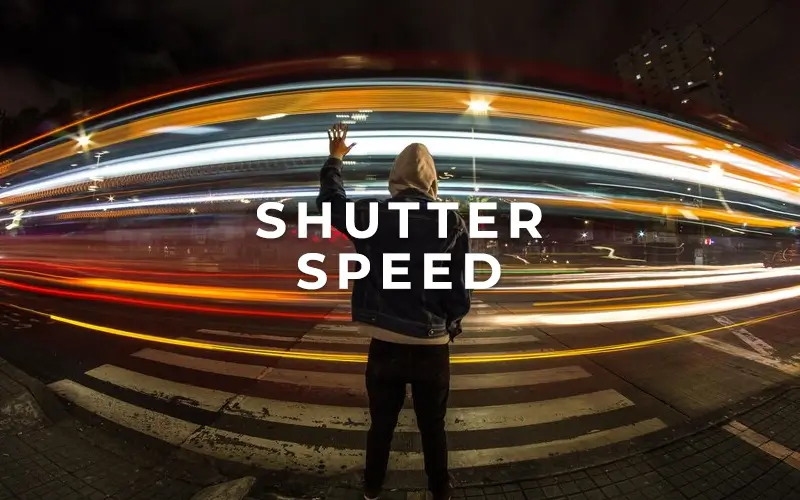
Shutter speed
Shutter speed is the duration of time the camera’s shutter remains open, allowing light to pass through and reach the sensor. Shutter speed is measured in seconds, or fractions of a second, for instance, 1/500, 1/60, 1/2, and so on. A faster shutter speed (1/1000) allows less light to enter the sensor. This is useful in bright lighting conditions or for freezing a fast-moving subject. A slower shutter speed (1/30) allows more light to hit, which is beneficial in low-light scenarios. However, it can often result in motion blur if the camera or the subject moves even slightly.
An excellent example of how shutter speed affects motion effects is capturing a bird in flight and taking a photo of light trails from cars at night. In the first case, a fast shutter speed of 1/2000 is to be maintained. It is also ideal for sports photography.
On the contrary, in the second situation, a slow shutter speed of 10 seconds will do just fine. Capturing the flow of water in a stream can also be done beautifully at a slow speed.
-
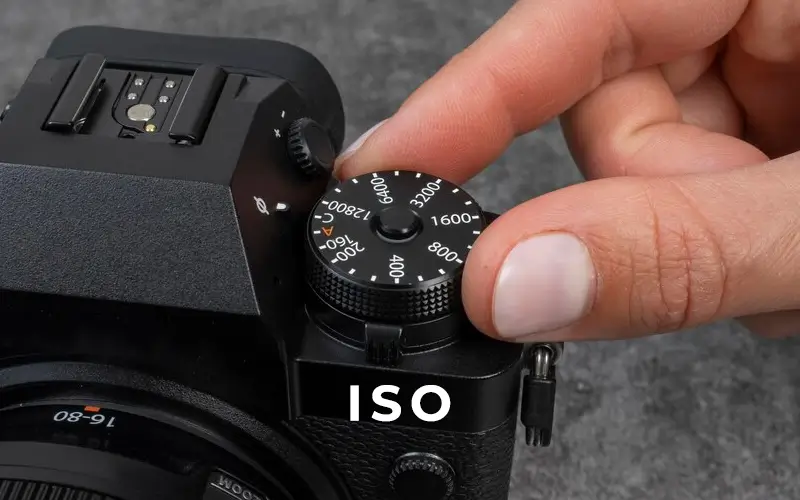
ISO
ISO refers to the sensitivity of the camera’s sensor to the amount of light. It is one of the three pillars of the “exposure triangle” in photography and determines how bright or dark the photos will appear, especially in low-light situations. It originated in film photography but now applies to contemporary, modern digital sensors. The sensitivity levels are measured in lower and higher ISO values; for example, lower ISO values like 100 or 200 mean lower light sensitivity.
This produces clear images with less grain or visual noise. On the other hand, higher ISO values, like 1600 or 3200, increase the light sensitivity of the camera’s image sensor. This is useful in low-light conditions but usually degrades image quality, creating noise. Although modern digital cameras have enhanced ISO performance, some image quality still gets compromised.
A good example of ISO can be when someone does a photo session in bright daylight or on a sunny day, lower ISO of 100 adequately suffices. However, when the light is dim, especially in indoor photography, the photographer needs to increase the ISO level to 1600 or even higher. This way, the image is captured without a flash.

How does the “exposure triangle” work together?
The secret of mastering exposure lies in balancing these three key photographic elements. An experienced professional photographer is one who has clear clarity on all three. This is why it is always better to work with professional photographers. Working with professional photo editors also helps because if something is amiss during the photo shoot, the photo editor can rectify that during the post-processing.
Let’s find out how aperture, shutter speed, and ISO interact with each other to create the desired exposure level.
If the aperture is widened (i.e., lower f-stop) to let more light pass through, the shutter speed must be increased. This is done to avoid any chance of high exposure levels. With a narrow aperture (higher 5-stop), the shutter speed needs to be lowered. This allows for more light to pass through, especially in low light-environments. In both of these cases, ISO acts as a balancer. If the desired exposure is not achieved by adjusting the aperture and shutter speed, then increase the ISO. However, this might bring down the image quality a little.
Example scenarios:
- Sunny day: Lower ISO (100), smaller aperture (higher f-stop like f/11), and a fast shutter speed (1/500)
- Indoor dim light: Higher ISO (1600), larger aperture (lower f-stop like f/2.8), and a slower shutter speed (1/60).
- Action photography sequence: Faster shutter speed (1/1000) for motion freeze, moderate aperture (f/5.6), and adjust ISO to balance the exposure.
There you are. You can now harness the art of achieving optimal exposure and creating well-exposed images with the above exposure techniques in photography. Each element has its own unique impact on a captured photo and is crucial for the professional success of a photographer. By knowing these subtle tricks and tips, one can ensure their photos are both technically sound and aesthetically expressive.
Now, let’s proceed to the final segment of this comprehensive guide to exposure in photography. This section details the practical tips photographers must consider while taking photos in different lighting conditions. Keep scrolling.
5 valuable tips for achieving correct exposure in different lighting conditions
Professional photographers often have to face several unfavorable situations while taking photographs. The most common scenario is varying lighting conditions. Achieving correct exposure in such lighting conditions can be challenging; at the same time, the exposure must be accurate. But fret not. We have some practical tricks and tips that can come in handy for you to take stunning photos in different situations.
-
Utilize exposure triangle
Hope by now you have understood the significance of the three components of the “exposure triangle”. Utilize each of them in specific lighting conditions. Start with a base setting that suits the lighting in the environment; you may regulate the aperture, shutter speed, and ISO accordingly.
Tip: If there’s still something wrong with the exposure, a professional photo retouching expert can fix that by editing the image. Usually, in real estate photo editing services, most of the photos are retouched later during post-processing.
-
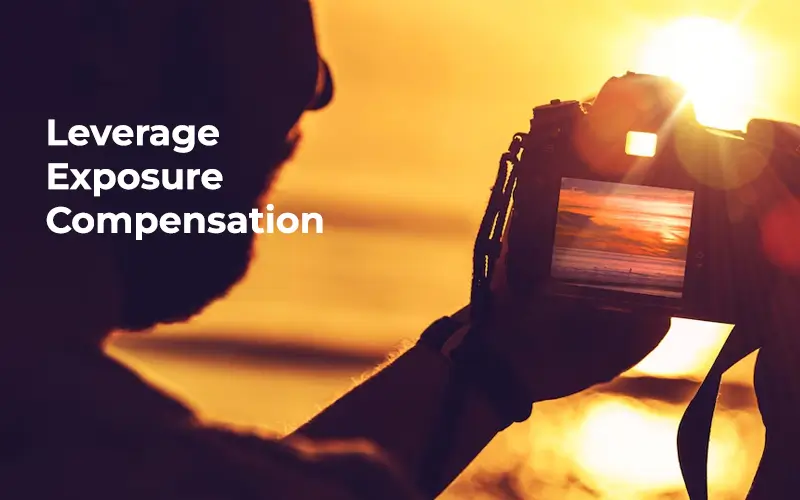
Leverage exposure compensation
Exposure compensation is a crucial tool in photography for overriding the default exposure settings. It is a highly important setting or function that adjusts the camera’s exposure level without altering the aperture, shutter speed, or ISO. Use this feature, especially in tricky lighting conditions where your camera’s metering system might get compromised, like in high-contrast environments or backlit scenes.
Tip: In backlit lighting, increase the exposure compensation setting by +1 to +2 stops to avoid underexposure. In high-contrast environments, capture multiple shots with different exposure compensation settings or bracketing to achieve the desired exposure. This is how you get the ideal exposure to process HDR (High Dynamic Range) photos. Usually, in photo post-processing, HDR editing is done for exterior real estate images to depict properties in their best light.
-
Utilize natural light and reflectors
Utilizing natural lighting is the best way to dramatically enhance exposure. Aspiring photographers must learn how to leverage it to improve their photographs. Especially in outdoor settings, such as pre-wedding and wedding photoshoots, modeling photoshoots, product photo sessions, etc., using reflectors and diffusers helps manage natural light. With reflectors, you can bounce light onto the subject to fill in shadows and create even lighting. Diffusers soften harsh light, thus lowering the chance of over-exposure in brightly lit situations.
Tip: During the golden hour or twilight, if you are a real estate photographer, use the warm, diffused light to achieve a dreamy photo. This is a natural diffuser that you can use. For product photographs, place a sheer curtain between the light source (preferably sunlight) and the subject. Similarly, in bright sunlight, place the subject in the shade and use a reflector to bounce light on their face, creating a balanced exposure level. You can use regular aluminum foil, white sheet, white cardboard, etc., as reflectors if you do not have a big budget to afford professional reflector screens or reflective umbrellas.
-
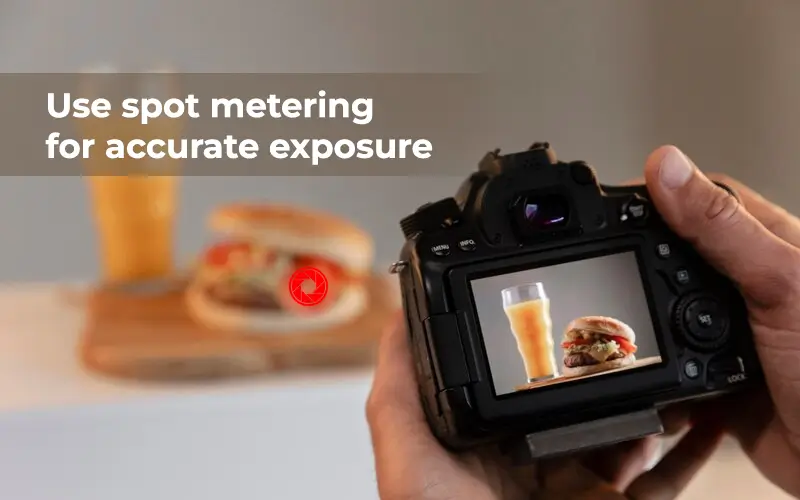
Use spot metering for accurate exposure
Metering is the process by which a camera decides what an ideal exposure is. Spot metering is a mode that helps the camera measure a small area of the scene, usually centered on the focus point. When this mode is selected, the camera uses a very small circle between 1% and 2% of the entire frame to calculate and determine the perfect exposure. This mode helps generate precise exposure for specific subjects in challenging lighting environments.
Tip: In extreme lighting contrasts, such as the subject positioned in front of a bright window, select the spot metering mode to measure the light on the subject’s face. This will at least ensure an accurate exposure intensity for the subject, even if the background becomes over-exposed.
-
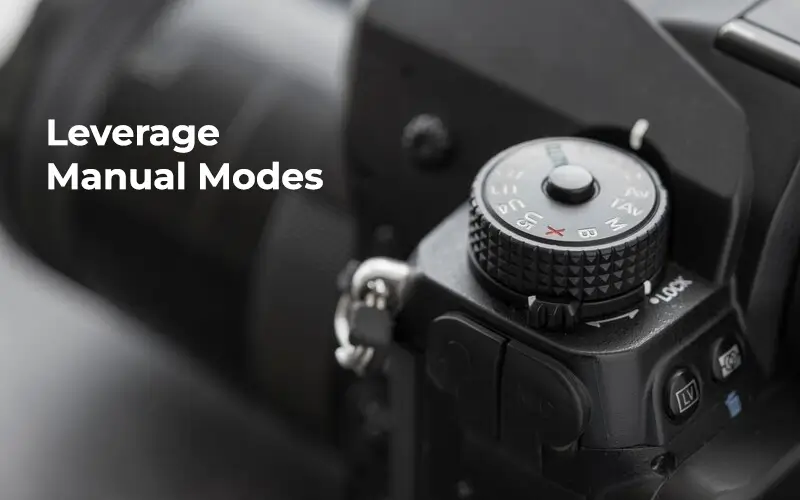
Leverage manual modes
Automatic and semi-automatic modes are very convenient, especially when you have to take photos in bulk. However, practicing with manual modes gives you complete control over exposure settings. Leveraging manual modes helps you understand how changes to aperture, shutter speed, and ISO affect exposure in real-time. Simply put, when you set your DSLR into manual mode, turning the dial into an “M” sign, you automatically get full access to all the parameters. You can take further creative control of the shots by regulating the aperture, shutter speed, ISO, white balance, and so on.
Tip: Begin with setting the ISO based on the available lighting situation. Thereafter, select the aperture to achieve the desired depth of field, and finally, adjust the shutter speed to balance the exposure. Along with that, use the camera’s light meter as a guide, and keep the exposure indicator centered. You may take multiple test shots and review the histogram to ensure precise exposure is achieved or not. This might take a few weeks of practicing, but when done right, it makes you a photography expert in the long run.

Conclusion
It’s time to wrap up! We believe it was an enjoyable read and that readers have gained extensive knowledge on mastering exposure in photography. It is undoubtedly a vital skill set to handle a variety of lighting scenarios and transform ordinary snapshots into visual masterpieces. Whether you are capturing a vibrant sunset, an intricately detailed macro shot, or a fast-paced sports event, achieving the correct exposure level is imperative.
As your photography journey continues, be more fluent in the “exposure triangle”, practice the tips mentioned, and leverage manual modes, spot metering, and natural lighting. This way, soon, you’ll gain the confidence and skill required to create consistently well-exposed and visually compelling shots.
Also, if you need professional help to fine-tune the photos further, there are several expert digital photo editing services providers available. These external agencies are backed by accomplished photo editors and post-processing experts with years of experience. Hire such a team and get your photos professionally edited at a lower cost with a fast TAT .