A gradient refers to one of several processes that are applied by graphic designers to facilitate a smooth transition between two adjoining colors, which may include black and white as well. In simpler words, a Photoshop gradient is an effect that is defined by the merging of one shade, color, or brightness-level into another. Widely used in graphic and web design, gradients are applied to modify different colors of an image and enhance them so as to create a customized version of that image. Gradients feature colors of different densities and the shades extend in diverse directions. An experienced graphic designer can creatively combine effects together to induce a drastic change in the color effects of an image.
With Photoshop’s gradient tool, gradients can be used to create virtual shadows or to portray weather conditions. You can divert a gradient to clockwise, anti-clockwise, or to any irregular direction through an appropriate use of the Photoshop gradient tool. You may apply different colors together, place them in the most appropriate sequence, draw a line to mark the direction of the gradient and incorporate some other tailor-made effects so as to instill the right of contrast in the image.
Types of Photoshop Gradients
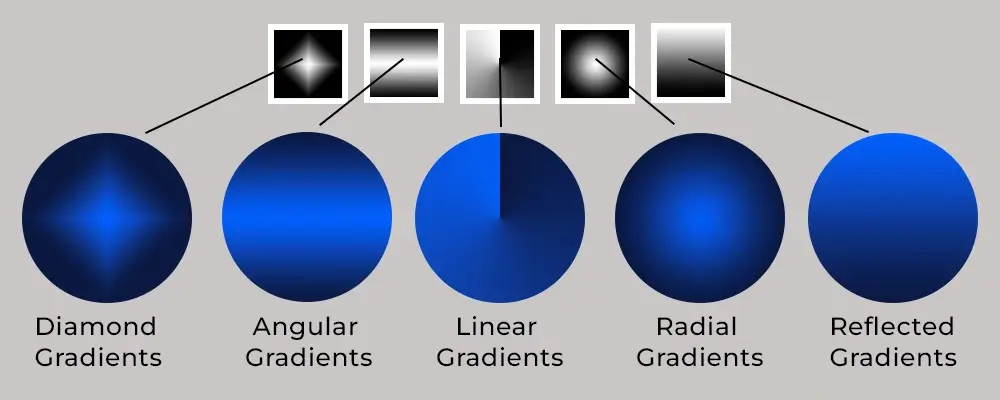
The Photoshop tool comes equipped with multiple types of gradients, thereby allowing graphic designers a high degree of freedom to explore creative ideas. An Adobe tutorial lists the following types of Photoshop gradients:
-
Diamond Gradients
These gradients emanate from a centrally-located starting point and move outward while taking the shape of a diamond.
-
Angular Gradients
Angular gradients are those that radiate in an anticlockwise direction from the starting point.
-
Linear Gradients
These gradients are formed when one color merges into the next color in a linear fashion.
-
Radial Gradients
Radial gradients are created when one color transitions to the next color in an outward fashion from the center of a circle.
-
Reflected Gradients
These gradients are created when colors progress outward from a central starting point while sporting a mirror-like appearance.
The Photoshop Gradient Tool: A Brief Overview of Each Tool
Here’s a brief summary of Photoshop’s gradient tool, which would help you to easily understand usability:
-
Panel Menu
Common types of gradients are displayed by this menu. What you should know is that these gradients are the patterns and not the colors that are being displayed.
-
Opacity Stop
This tool determines the transparency level. For every color, there would be one opacity stop. To modify the transparency level, you may move the opacity slider either to the left or right.
-
Color Stop
This feature determines the gradient color. You need to select the left color stop below the gradient bar in order to choose a starting color. After this, the triangle on top of it will transform into black color, portraying that the color is getting edited. When you edit other colors, do apply the same process, but pay proper attention to use the suitable color stop.
-
Stop Values
Stop values perform the same job as the color and opacity stops, however they differ in one aspect. You need to insert a number to determine the level of opacity and the position of the opacity stop and after that, you would have to pick a color from a palette and insert a number to indicate the placement of color stops.
-
Midpoint
This is the section that features a uniform mix of the two colors.
Apart from the above-mentioned features, Photoshop’s gradient tool comes equipped with several other options for customization, thereby allowing you to address specific project needs in the most efficient manner. Notably, the tool features a number of blending modes with each mode having a unique way for the gradient to connect with the underlying layers. The tool features an opacity slider, the main function of which is to determine gradient transparency. When you shift the slider to the left, the level of transparency increases, which, in turn, exposes the underlying layers.
Three Important Checkboxes in the Gradient Tool
-
Reverse
This is an interesting feature that inverses the sequence of the colors.
-
Dither
This feature allows users to modify the degree of smoothness when one color is transitioning into another color.
-
Transparency
Using this feature, you can regulate the opacity from the gradient.
Additionally, the gradient tool features a noise gradient option, which you can create by choosing colors from a specified range and then displaying them in a random manner.
With this, we hope that you have had an in-depth introduction to Photoshop gradients and the gradient tool. In the next step, we are going to introduce you to
Building Expertise to use Gradients in Photoshop
One of the most useful tools in Photoshop, gradients can be used to create awe-inspiring backgrounds, stylish texts, and hip-looking buttons. Notably, they can also be used to instill special effects in scenes. Interestingly, you can even alter colors within the gradient by changing the opacity levels. Additionally, you can merge gradients while instilling layer effects while using different textures and different techniques such as masking. One thing which you need to note is that gradients cannot be used with bitmaps.
A tutorial on gradient creation
The gradient creation technique is an art. If you are using the Gradient tool for the first time, you should apply Shift+Ctrl+N to create a new layer and use white to fill it up using RGB: 255,255,255.
In the next step, identify the section of the layer that you would like to fill. If you are not making a selection at this phase, you will end up applying the gradient to the whole layer. You may either press G or click on the Gradient tool in order to activate it. After this, click on the triangle in the Options toolbar. This would lead you to Gradient Samples. Select a sample that you are liking the most. Make sure to observe how the selected gradient looks in the wide assortment.
Now, you have two options. You may either fill the layer with the gradient or you may choose to edit the gradient by selecting the wide gradient sample and opening the Editor tool.
Filling the layer with the gradient
The gradient-appearance will be influenced by the location of the point where you place the cursor and the location of the point where you release it.
The Gradient Editor
What makes gradients wonderful is the fact that you do not need to limit your creativity by choosing presets only. You can use the Gradient Editor tool to customize presets as per your requirement or to create unique presets on your own. Access the Options toolbar and select the wide gradient. With this step, you would open the Editor along with the gradient that you have chosen. Now, you will be able to modify the selected gradient, choose another preset, or create something of your own.
When you use the Gradient dialog, you will find a few options. You would find gradients at the top and you may choose any gradient for customization. In the middle, you will find the Noise gradient that comes with different controls for color-restriction, RGB transparency, and various kinds of color models such as HSB, RGB, and LAB. You can use the controls to randomize colors and to alter the level of roughness as well.
- After you select any color stop below the gradient, you will find the triangle to be blackened, which is an editing indication. This is followed by an activation of the color swatch as well as the location (which, at this point has the number 0).
- The location number would change if you shift the color stop towards the right. By selecting the color swatch option, you would activate the Color Picker option that you can use to change the color.
- Between the two stops, you would find the small diamond that you can use to create a uniform color-mix. You may pull it to the right or left to change the color-mix.
- If you wish to include a new color stop, you may put the cursor at that particular spot and click the left button of the mouse. This way, you can add a color stop and the color information gets displayed in the dialog box.
- You can get access to the Opacity information and regulate gradient-opacity by clicking on any of the black stops above the gradient.
- When you feel that you are happy with the edits, you may now visit the “Name” section, insert a new name, and hit the “New” button. With this step, you will be able to save your new preset in the current list of gradients.
Top 10 websites to download free gradients
While you may choose to commit your time towards developing custom and unique gradients, presets, and textures, you may still want to take a shortcut route if you are pressed for time and you need to execute multiple projects simultaneously. Here’s a list of top 10 websites that would allow you to download high-quality gradients and textures for free:
-
Subtle Patterns
Subtle Patterns boasts a library featuring simplistic, vector-based textures and patterns. You can download the gradients and textures for free in exchange for a comment within your CSS or HTML source code in order to give credit to the creator. The website also features a plugin that links its texture library within the users’ Sketch and Photoshop panels.
-
UI Gradients
This website features a very simple user-interface and maintains a repository of clean and subtle gradients. Majority of the gradients that are featured on the website are shortlisted from the user-contributions list. Users would find it quite easy to browse through the gradients and if they find a gradient to be useful, they can easily download it by copying the CSS code to their clipboards and pasting it into their projects.
-
Transparent Textures
Transparent Textures does not have a special design that’s worth a mention, however, it allows users to find and use gradients and textures in a very unique manner. Its collection of gradients and textures are directly linked with the library of Subtle Patterns, but you will be allowed to preview the outcome in a browser before you can view it on Sketch or Adobe.
-
Lost and Taken
Lost and Taken hosts an incredible library of textures and gradients. Notably, it features more textured images compared to vector images. The textures and patterns are usually the contributions made by the users. The gradients, which appear in non-classified form, can be downloaded for free for personal as well as commercial projects. This is a community-run platform, so you may want to contribute a few bucks towards its maintenance. This is a good idea if you are using it quite frequently.
-
Opengraphicdesign.com
This website features 48 vector gradients, which is what makes it a good basic repository. You will come across some ready-to-use light and black colored gradients and gradients in shades of blue and green as well. This would be your ideal choice if you are a beginner and if you are looking for a selection of relatively simpler gradients.
-
Deviant Art
This is a great platform that would give you access to some really awesome Photoshop resources. Deviant Art is noted for its selection of 140 metal gradients that are meant to be used for Illustrator. It has a collection of metallic gradients that mimic the looks of gold, silver, copper, brass, steel, aluminum, chrome, and bronze.
-
VectorPortal
Vector Portal features six gradient collections that host a total of 700 gradients with each collection having 75-160 gradients. Users are allowed to download all six packs from the platform.
The Magic of Gradients
With gradients, you can achieve vintage effects or warm, sunrise, sunset, and cozy effects in a very short time. You can also portray a particular time of the day by applying gradients in a suitable manner. Photoshop allows you to easily customize gradients so as to instill a feel of realism. You can create diverse gradients using various patterns and color schemes and experimenting with new ideas to create novel outcomes. Using gradients can be a real joy provided you master Photoshop and make the most out of it.