Photo editors often come across the scenario when they are asked to remove a particular background from the image and add it somewhere else. However, the one thing that comes in as a hindrance is a person's hair or an animal's fur. It is really difficult to make a precise selection with all that furs and hairs in the way. Fortunately, there are ways to overcome this issue. Now, it's not just possible, but easier to make complex selections just like the way you drag a brush and remove the subject from the background while ensuring refined areas.
In this article, you are going to learn about the basics of Quick Selection and Refine Edge tool in Photoshop, and how you can use it to get the best results while editing images. So, let's start by taking a brief look at the basics of both the tools.
What is Photoshop Quick Selection Tool?
The Quick Selection Tool photoshop is one of the vast range of tools provided by Adobe Photoshop. It is mostly utilized for selecting a particular segment of the image with ease. It is widely recognized for its precision and time sparing features while dealing with raster images. There are many tools in Photoshop toolkit, which can be used to accomplish the same task roughly. However, each of them has their own specialty. Another tool, such as Magnetic Lasso, also enables you to select objects but needs more time and a steadier hand. Object Selection Tool is also a great handy tool to select objects that have an uniform shape.
One of the biggest advantages of using the Quick Selection tool is that it provides cleaner edges and more control to select or deselect the smaller areas. For example, if a person is standing with his hand on the back of his head, you can see the background behind his arm's crook. In case you are willing to change the background of the image, then you also have to make changes in the small area. Thus, with the help of this tool, you can select the smaller area, i.e., the triangle between the person's arm. Other selection tools might also allow you to select the same but along with the entire person. Besides, this tool allows you to select or deselect multiple areas of the image at the same time with a simple swipe of the mouse.
What is Photoshop Refine Edge Tool?
The Refine Edge Photoshop Tool is mainly used for selecting intricate shapes like hair, fur, branches, or any part of the images that are having complex edges. By using it, you can showcase your creative side by selecting the areas and cropping it out or adding new backgrounds to it as per your need. While dealing with complicated edges, it is not always the best choice to use other tools. It might work while there is also a possibility that it won't just like the way you need it. Hence, find the refine edge tool and use it to easily select any types of images having a complex edge.
For instance, when it comes to using the Magic Wand Tool, it is somewhat unpredictable. The Pen Tool, on the other hand, can allow you to make a selection by creating and connecting points along with a particular shape. Even though it is a preferred choice for many and is quite accurate, it is a bit slower and time-consuming.
How to Remove a Background using Quick Selection & Refine Edge Tool in Photoshop?
Check out the steps below to learn how change background using photoshop.
-
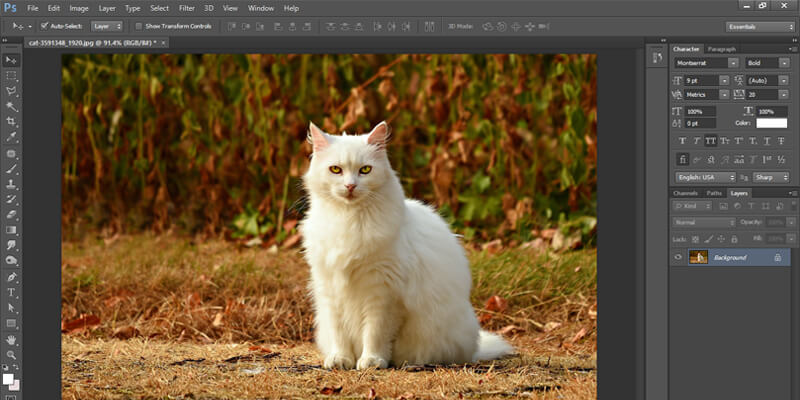
Open the desired image in Photoshop
For opening the image, you first need to select it and then drag it on the Photoshop icon present on your desktop. However, if you have already opened Photoshop, then go to File> Open and find your photo.
-
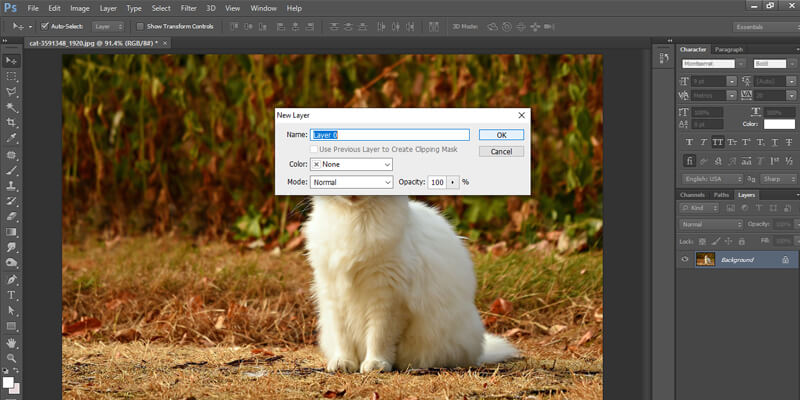
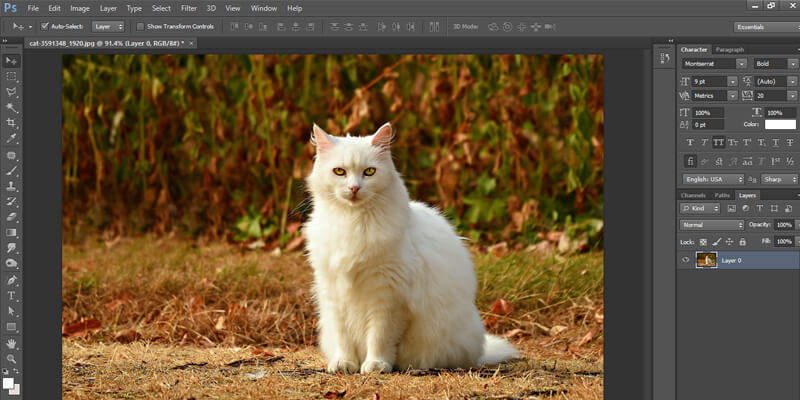
Unlock your Photo Layer
Go to the Layers Palette and double-click on your photo layer. It usually says Background, but you can also name it. So, name the layer as per your wish.
-
Duplicate your Photo Layer
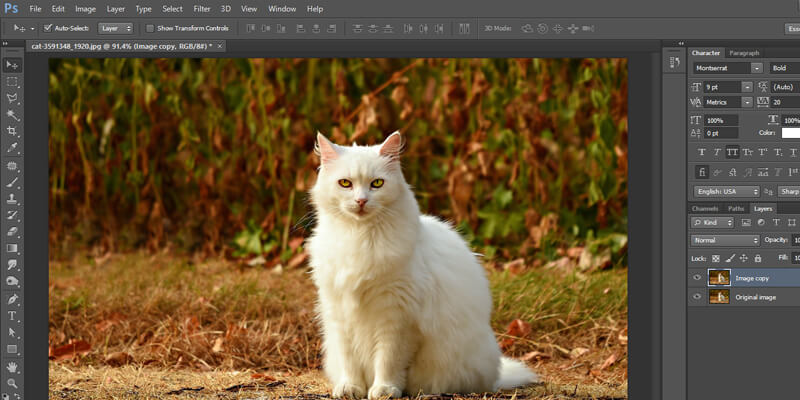
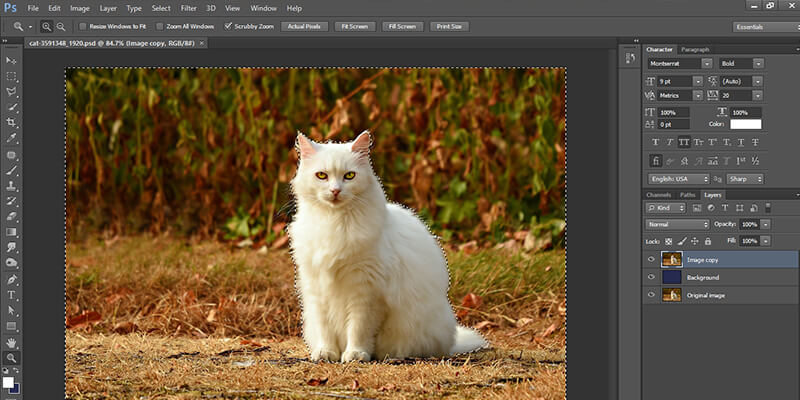
Once your photo layer is unlocked, it is better to create a duplicate copy so that the original one is safe. For doing this, you need to select the layer and then press Command + j. Another way to duplicate is to right-click on the layer and select Duplicate Layer from the fly-out menu. Now, click the New Layer button that is present at the bottom of the Layers Palette. You can now have three layers.
-
Create a background layer
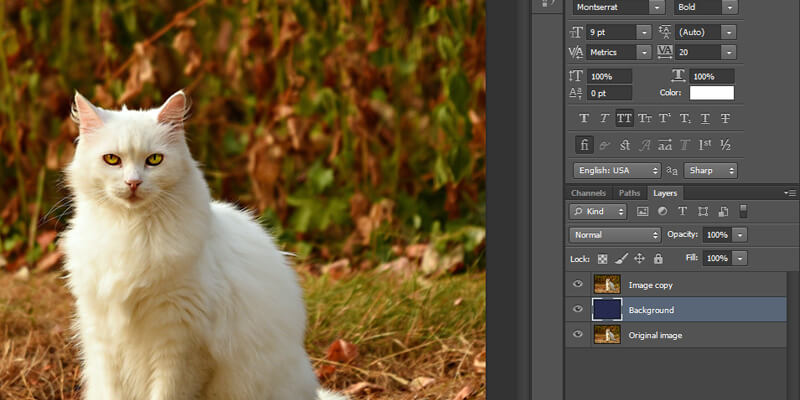
The purpose of creating a background layer is that it can help in identifying the selection edges even after you delete the background from the picture. For creating the background layer, you need to click on the Create a New Layer button. Besides, you can also create it by going to Layer> New> Layer.
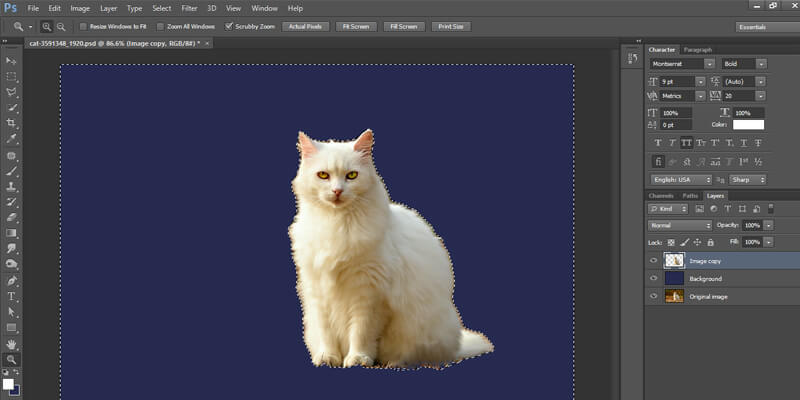
Now, click on the Paint Buck Tool present in the Photoshop Tools Palette and select a background color of your choice. Use it to fill the new layer. Use the Quick Selection Tool to select the desired area. It is okay if the selection is not perfect, as you are going to refine the edges later.
-
Choose the foreground object
With the help of the Quick Selection Tool, select the desired objects you would like to keep. Start from the center of the object and drag out. This technique is best as the tool tends to select similar contiguous color groups. However, if you click the background or drag in, then that will add it to your selection
You can also increase or decrease the tool size by using [ and ] keys. In case you are having trouble with using the Quick Selection Tool, then you can also use the Lasso Tool. Using both the tool is also possible, but you need to hold the Shift key to get the Add to Selection version of the selection tool.

-
Refine the edges of your selection
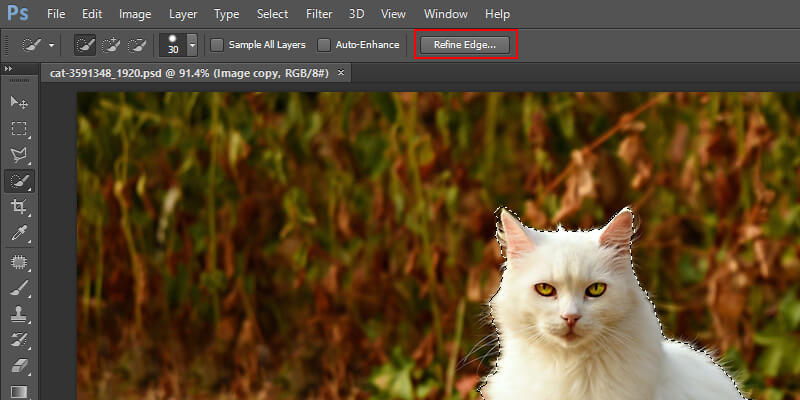
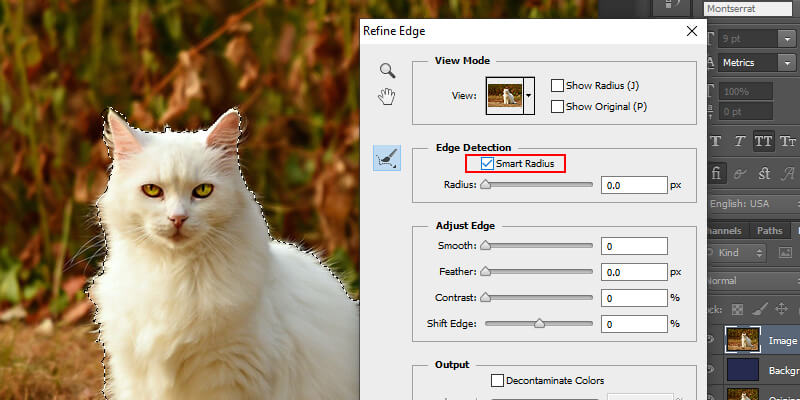
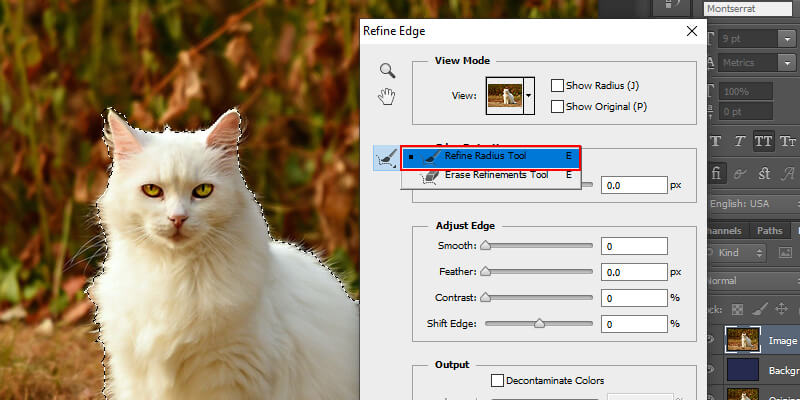
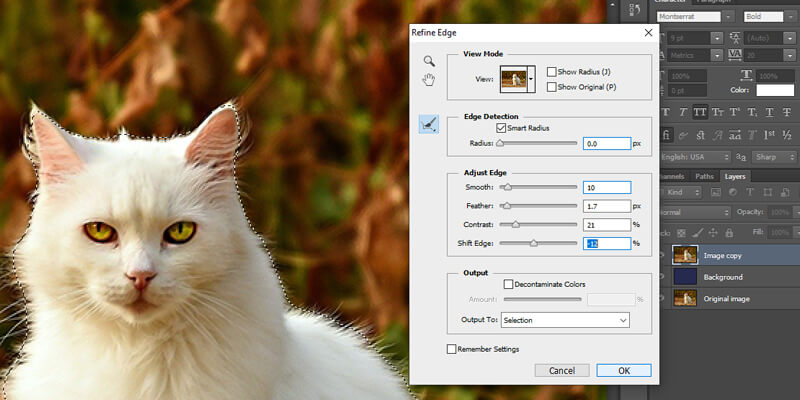
For refining the edges, use the Refine Edge button present at the top of Photoshop. Once you click it, the Refine Edge menu opens. You can drag the menu out of the way to see how your photo is affected by the selection. Now, check Smart Radius checkbox, which is available within the Edge Detection group, and select the Refine Radius Tool. Ensure that the Refine Radius Tool is active and use it to paint your selection edges. It will help in adding smaller details like hair and fur to the selection. Now, use the sliders available in the Adjust Edge group to fine-tune the selection and click OK.
-
Delete the background
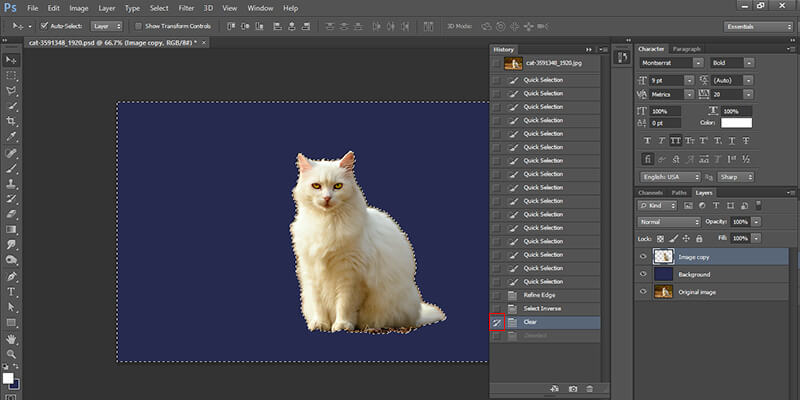
Now, you can easily notice your selection around the foreground object. Unselect it by pressing Command + Shift + i or going to Select > Inverse. Click on Delete and see the background layer you have created earlier.
![delete the background delete the background]()
-
Add touch-ups to the image
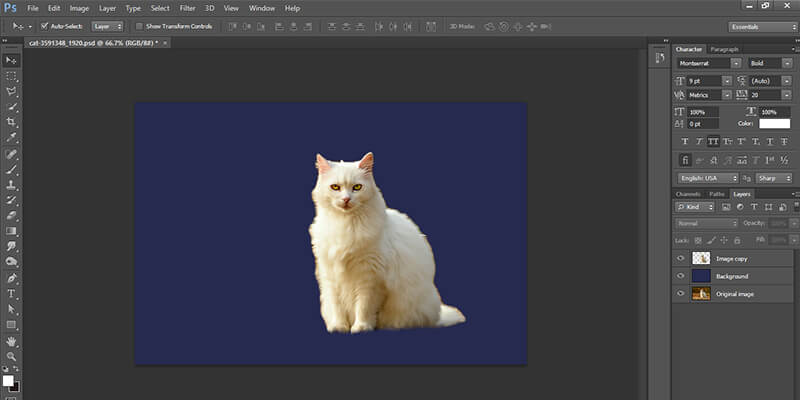
Try using the History Brush Tool to fill in the unwanted spaces that are present within your foreground image. Now, open the History Palette, and don't forget to click the open box that is present next to action for selecting the state of the image. Incorporate the Eraser Tool for removing the unwanted parts of the background that are still there.
![add touch-ups to the image add touch-ups to the image]()
-
Final course of action
You can now put the foreground image on any background you like.
![foreground image on any background foreground image on any background]()
![quick selection & refine edge in photoshop quick selection & refine edge in photoshop]()
It's not like using the above two tools is the only way that can help you to make the selections. There are many tools available in Photoshop like the Lasso Tool, the Magic Wand Tool, the Pen Tool, the Polygonal Tool, etc. that can serve the purpose. However, the Quick Selection and Refine Edge brush tools are undoubtedly the best and can help you to carry out the tasks with ease and perfection. Besides, these are also helpful in making accurate selections for complex objects. Also, keep in mind that since the tools are quite advanced, you need to keep practicing to use it more appropriately for your photo editing. With continuous practice, you can quickly make selections and work more efficiently while editing the images.
Conclusion
If you like this tutorial, then you can visit our website to see other articles related to Photoshop. You will find various topics that can help you strengthen your basics. For example, check out how to use Photoshop for photo editing or retouching purposes. We can also give simple tips on how to create layer with the Layer Mask tool in Photoshop. You might also come across various advanced topics, like Photoshop tools and functions where we have discussed the different tools it possesses.

