In photography, the more perfectly you edit, the better the output. With meticulous artistic editing, even ordinary photos can transform into stunning masterpieces. However, beginners often feel at a loss at the start of their careers and tend to make some editing blunders. Today, let’s find out about these common photo editing errors that degrade the quality of your work. If you are an aspiring photo editor or an intermediate, bookmark this guide, as it will help you develop your editing skills.
Usually, beginners are burdened with several things that undermine their efforts. Too many software to choose from, a steep learning curve, user-unfriendly interfaces, too many guidelines to follow, and, most importantly, deadlines! By identifying the common missteps, they can not just enhance their photos effectively but also solidify their careers as digital artists.

So, without further delay, let’s jump into the main crux of this informative article. Keep scrolling!
Why is photo editing important?
Before we move on, a quick recap of the importance of photo editing in enhancing digital images. Editing photos not only enhances them but also captures raw emotion and transforms them into highly appealing visuals. Adjusting brightness, contrast, and saturation, correcting flaws and imperfections, manipulating colors, and adding effects - all make digital photos more engaging and attractive.
As well as they genuinely convey the artistic impression and the intended message to the target audience. Be it product photos, real estate photos, professional portfolios, or wedding images, image editing gives creative freedom to the editor. With just a few clicks, they can remove distractions, like dust spots, specs, stains, and objects, highlight key elements, and make the subject appear polished and professional. Also, photo post-processing helps optimize digital images for multiple platforms and screens, ensuring they look best regardless of the device.
It is for all these reasons that photo editing has become indispensable for modern photography. This is why more and more marketers are investing in getting their product and property photos edited professionally. Be it eCommerce product owners, realtors, furniture manufacturers, or fashionistas, professionally edited photos give them a strong advantage that nothing else can.
5 common mistakes that degrade the quality of edited photos
As we know, image processing improves its quality manifold. However, it is important to be aware of some common pitfalls associated with image processing. Otherwise, it can compromise the quality of the edited photos and make the end client dissatisfied.
To make things easier for our aspiring image editors, we have detailed five of the most common photo editing blunders and how to avoid them.
-
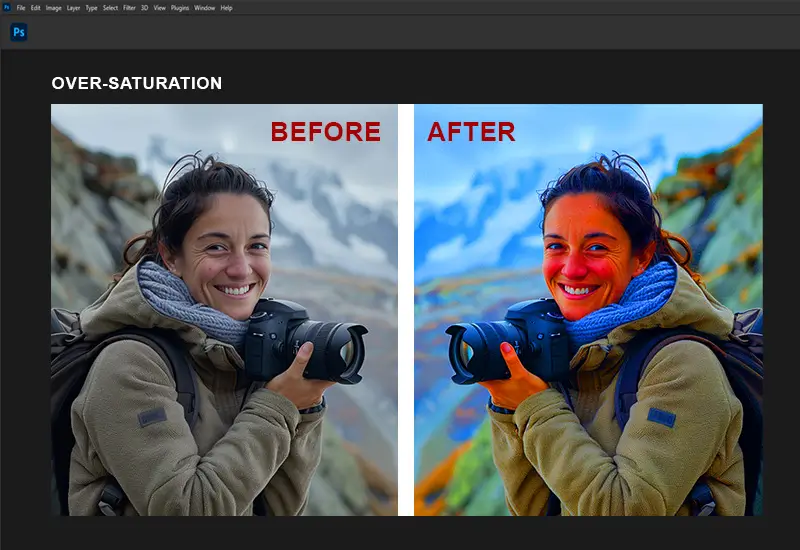
Over-saturation

Over-saturation is one of the most common issues that beginner graphic artists find most difficult to deal with. This mistake happens when the colors are enhanced too much, resulting in an unnatural, overly gaudy-looking photo. In fact, in certain overly intensified photos, the subject’s skin tone ends up looking bright red or orange.
To combat this, subtly adjust the saturation while using the vibrance and saturation sliders. No matter which software you use, remember to compare the final product with the original image.
-
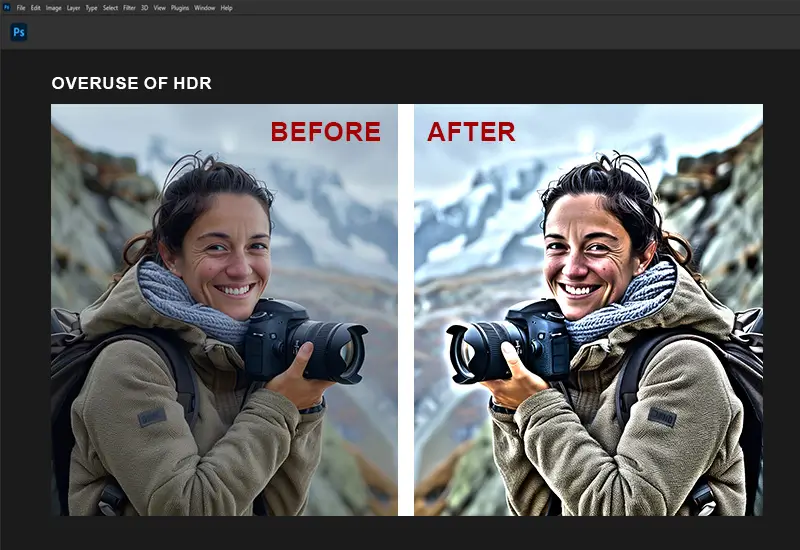
Overuse of HDR

Too much of anything is bad. As we know this old saying, overuse of HDR, or high dynamic range, leads to an unrealistic-looking photo with exaggerated contrast and lighting. This unnatural light and shadow balance spoils the photo’s originality and makes it distracting for the onlookers.
Fret not, you can easily solve this. Use the HDR functionality sparingly and adjust the intensity of its effects. Also, if you have time, try blending the exposures manually instead of selecting automated HDR settings. These tips and tricks can save a beginner photo editing artist from making the same mistake again and again.
-
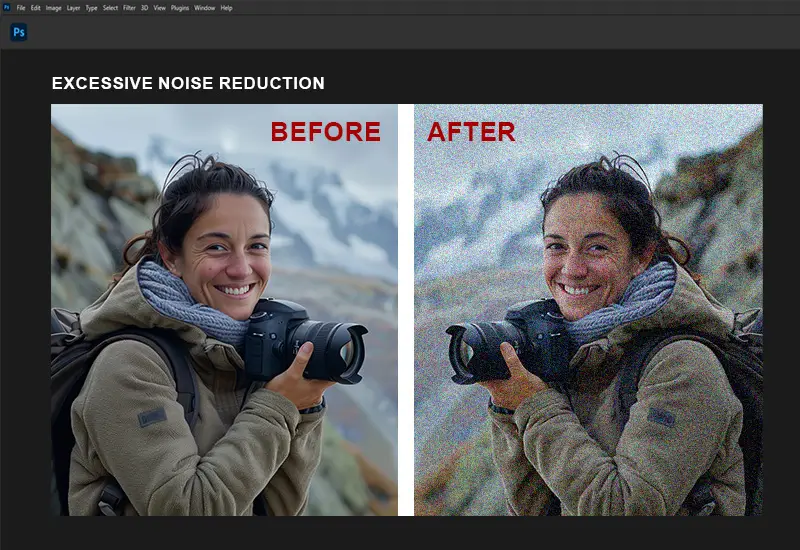
Excessive noise reduction

A little noise is good. One might find this surprising, but yes, it’s true that a slight grain or visual noise on an image makes it look more natural than an excessively noise-reduced one. Photo editing tools have advanced noise reduction features that can eliminate all graininess to a great extent. However, often beginner editors unknowingly use the tool far more than it is actually needed. The end result happens to be an unrealistic, blurry, or overly soft photo with no critical details or fine textures.
To fix this, be mindful when you use the noise reduction feature; apply it moderately with selective noise reduction techniques, focusing only on areas that have the most noise. Especially during portrait photo editing and fashion photo retouching.
-
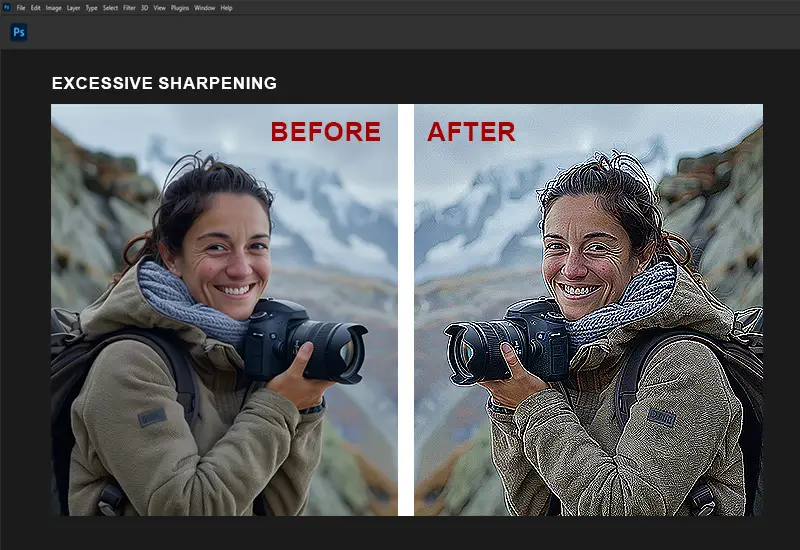
Excessive sharpening

Just like too much noise reduction, first-time image retouchers make the common mistake of sharpening the photo too much, to the point of creating unnatural textures and noticeable edges, diminishing the photo’s quality. Also, the photo starts looking unappealingly harsh, losing all its natural softness. In short, the image
Don’t make this mistake at all. If you do, then you need this trick. Apply sharpening in wise moderation. Use the tool carefully and zoom in to check for artefacts. Focus on enhancing only those areas that are genuinely blurred and happen to be the important details of the image. Also, try playing around with different sharpening settings if your photo editing software allows it and see which one looks perfect. This way, you can prevent the edited photo from looking overly harsh.
-
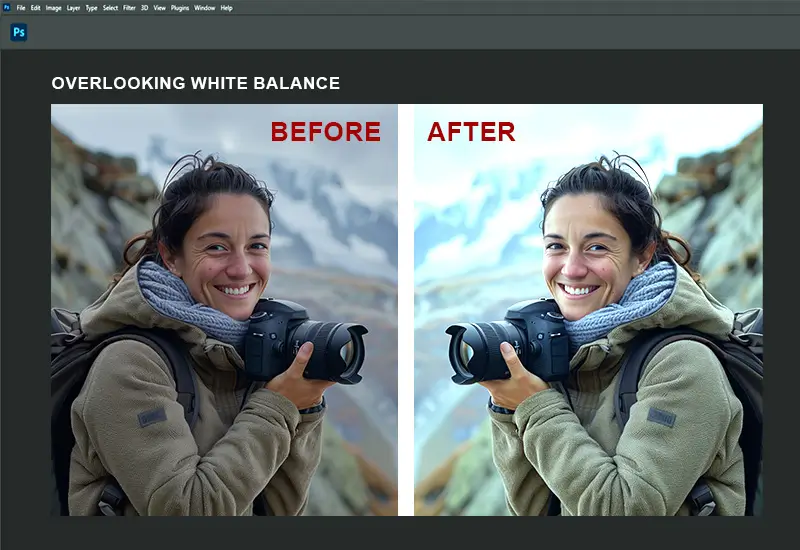
Overlooking white balance

This is also a pretty common photo retouching blunder novices make that affects the overall color accuracy of an image. Neglecting to adjust the white balance or implementing incorrect settings leads to unwanted color casts. As a result, the photo appears too warm (yellow/orange) or too cool (blue). These undesirable color casts immensely distract viewers from the subject, thus making the edited photo pointless.
Don’t sweat it. While editing, always be mindful of using correct white balance tools. Adjust the intensity to an optimal level to ensure the colors in the photo look true to life. However, if the damage is already done, neutralize the color casts by manually adjusting the white balance tools instead of auto white balance features.
There you go! Identifying and avoiding these common mistakes in photo post-processing significantly enhances the quality of edited images. As well as help the beginner make their way to becoming a pro. That said, mastering the balance between accentuating details and preserving integrity is the key to creating top-grade photographs. That is why digital marketers hire professional photo editing companies to enhance their product photos and make them worthy of clients’ attention.
5 best practices to enhance edited images
Apart from following the tips above to prevent the usual image retouching errors, there are a few guidelines that can produce professional-quality results. If you are curious enough to learn more about these best practices to make your photos more polished and appealing, scroll below.
-
Begin with high-quality RAW images
Always shoot in RAW format. This gives you more flexibility during post-processing, especially while making adjustments in white balance, exposure, contrast, color grading, etc. RAW files retain all the data captured by the camera sensor, which provides greater dynamic range and color depth.
-
Utilize adjustment layers and masks
Apply brightness, contrast, and color adjustments through adjustment layers for better-targeted editing. Also, use the layer masks to isolate areas you want to edit with precise control over where and how much adjustments is applied.
-
Maintain a non-destructive workflow
Non-destructive editing is all about preserving the original image information captured by the camera sensor. Use editing software applications that offer a non-destructive editing workflow with adjustment layers. If you are using Photoshop, save the work in PSD or TIFF to retain layers and adjustments. Also, you may experiment with virtual copies or snapshots to experiment with multiple edits without hampering the original image file.
-
Make final color and tone adjustments
Fine-tuning colors and tones is extremely crucial for creating visually appealing graphics that accurately reflect your creative vision. Tools like hue/saturation, curves, selective color adjustments, etc. help with this. Attention to skin tones is mandatory to make sure they look natural. Also, the white balance and other color grading tools should be adjusted to ensure accurate colors that enhance the overall mood. Alternatively, one may also use split toning to add subtle color variations to highlights and shadows for a more dynamic look.
-
Enhance details and textures
This trick adds depth and realism to the photos, making them look more engaging and visually attractive. The two main aspects here are clarity and sharpness. Apply clarity and sharpness adjustments to enhance details, but make sure no artefacts are generated on the image. In the process, utilize the sharpening tool to accentuate edges and textures without going over the top. For editing fashion photos or portraits, leverage the selective sharpening tool to enhance eyes and other key features while keeping skin smooth. Use the clarity slider to enhance mid-tone contrast, which brings out textures without much affecting the overall tone.
By following the above best practices, even a novice photo editor can deliver the best Photoshop service to their clients.
Master these picture editing techniques and develop a more refined and consistent editing style.
Conclusion
So you see, image post-processing, retouching, and restoration are transformative processes that involve an accurate balance between artistry and balance. By maintaining this balance, one can avoid making the common photo editing mistakes that spoil photo quality. It also makes the editor look sloppy and unprofessional.
Identify these pitfalls beforehand and start practicing. With more time, effort, and dedicated practice, even a newcomer photo retoucher can outsmart a professional soon enough.
However, if you ever need any expert guidance, feel free to contact the best photo editing service providers nearby. These external agencies are backed by seasoned professionals who can get all your photos edited at a lower cost and with a faster TAT. Hire such a professional image editing company and get stunning results. Good luck!

