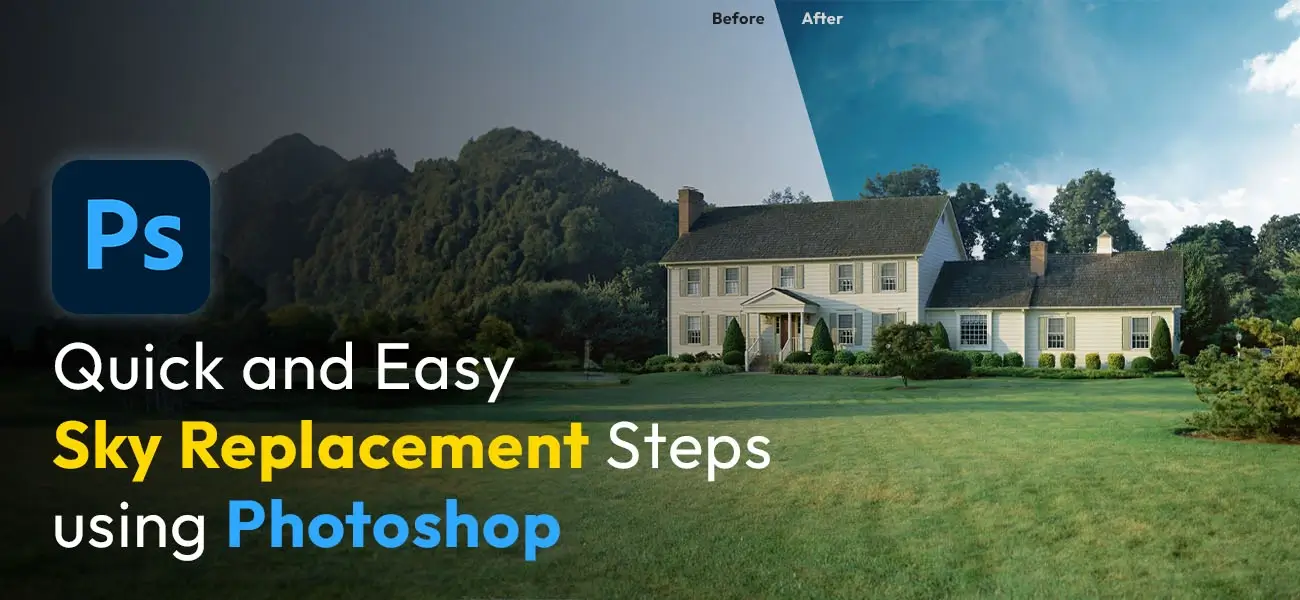
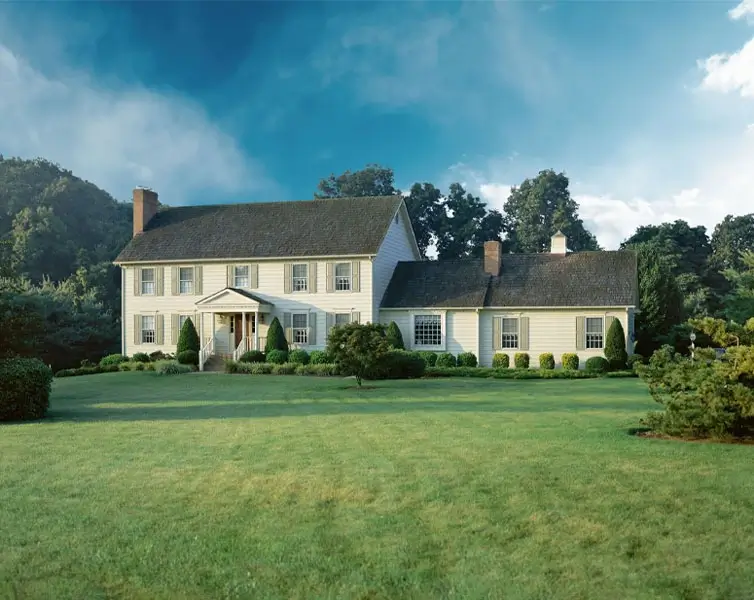
No matter how advanced a camera is or how adept the photographer is, often it is difficult to replicate an appealing sky backdrop. It’s normal for real estate photographs to have a dull, gray, and overcast sky. In such scenarios, sky replacement is a true lifesaver. Photoshop offers some great intuitive tools to replace the cloudy skies with a bright, clear, and appealing sky backdrop.
Whether you are new to Photoshop or have just started your real estate image post-processing workflow, bookmark this article. Here, we will discuss the steps of how to replace the sky in images using Photoshop in detail. Following these easy steps, you can quickly turn a dull sky into an appealing one.
Stick with us till the end and enhance your real estate photos.
But first, let’s find out the importance of changing the dull skies in property photos. Also, the benefits it brings in.
Why is sky-replacement service integral to the real estate sector?
There’s surely one aspect that photographers cannot control. On the date of the photo shoot, the sky can remain overcast, cloudy, or stormy. However, the sky is one of the most vital elements of real estate pictures, as it can significantly affect the onlookers’ mood. A clear, bright, and blue sky makes the photo welcoming to the prospects.
Whereas a dark and gloomy backdrop can appear mundane and uninteresting to them. Thus, simply put, to impress potential property buyers, realtors need visually captivating photos with bright skies.
This is where replacing the sky in a photo with Photoshop comes into play. A perfectly executed edit can blend the real image with a retouched skyline in the most natural way. The authenticity of the image can never be challenged.
Also, apart from cloudy skylines, there are a few more instances when professional photo retouchers add sky to photos using Photoshop. They are:
- Unwanted or redundant objects : Nobody wants a tangled mess of electric wires, a lamp-post, an aircraft, or random buildings to cover the skyline. This also has a major effect on how the buyers perceive the property overall. Adding new skies to the images using Photoshop is the best way to rectify this.
- Over-exposure : Many a time, especially in summers, the sunny sky appears too bright. This over-exposure negatively affects the rest of the photo, making it appear dark. Using Photoshop for editing the skies can save the day in these cases.
- Under-exposure : Likewise, on stormy days or monsoons, the sky appears overcast and cloudy, almost 24x7. However, realtors need to upload property listings regardless. Retouching with Photoshop is probably the best solution to upgrade the skies.
- Unappealing colors : Photographing at different hours of the day produces a variety of colors. Some colors look good and attractive. Whereas others do not so much. Replacing the sky in images using Photoshop implies color edits. These tactical edits improve the overall appeal of the property photos, making them more sellable.
The steps involved in replacing a sky from a photo using Photoshop
We’ve finally reached the most-awaited segment of this article, a step-by-step tutorial on how to replace the sky in Photoshop. We will try to break down and describe the steps as much as possible. Read till the end, and you will gain expertise in brightening the ambience of property images.
Let’s begin!
(Point to note: Before blending a new photo over the original version, ensure the new and edited image is the same size as the original photo. Also, the pixel dimensions must be the same as the original version.)
- Step 1. Keep the original photo in active mode. This will make it easy
to blend together.

- Step 2. Press Ctrl+C for Windows and Cmd+C for macOS, and copy the
original image.
- Step 3. Press Ctrl+V for Windows and Cmd+V for macOS, and paste the
image into the replacement photo’s document. Photoshop will position it on Layer 1,
above the replacement image.
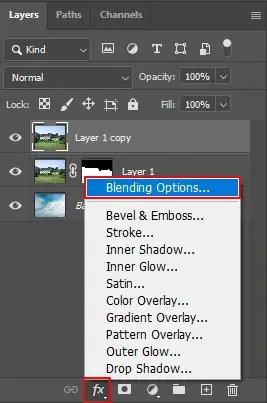
- Step 4. Create a duplicate of Layer 1. Keep this panel active
(highlighted in blue). Click Ctrl+J (Windows) or Cmd+J (macOS). A new panel named “Layer
1 Copy” will be created.
- Step 5. Select Layer 1 again, and outline the area below the sky. This
is actually done to save the main property or house from the Advanced Blending sliders.
- Step 6. Select the Lasso or Polygonal Lasso tool from the Tools menu
and start outlining around the top of the house.
- Step 7. Convert the selection into a Layer Mask. Select the Layer Mask
option from the icon located at the bottom of the Layers panel.
- Step 8. Activate “Layer 1”; Photoshop will automatically add a new layer mask to this panel. You can replace the original sky with the new sky image at this stage, but it won’t look professional yet.
- Step 9. Select “Layer 1 Copy” or the top layer and make it visible.
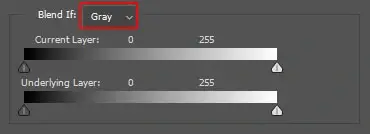
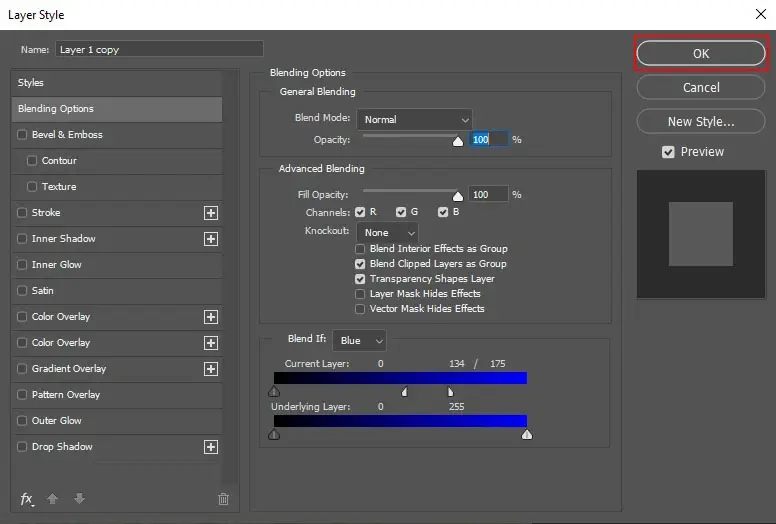
- Step 10. Go to the Blending options, located at the bottom of the
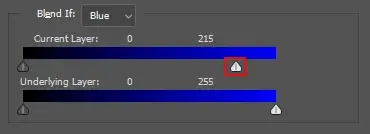
dialog box. Change the default “Blend If” gray option to Blue.
-
Now drag the upper slider (“This Layer”) towards the left. Gradually, the original sky photo will disappear, revealing the newly edited sky photo beneath it. Drag the new image until it completely covers the previous one's sky area.
- Step 11. Now, the last and final step is to blend the sky with the
foreground of the original image. A lot of harsh and rough edges will be there around
the trees and leaves. Click on Alt (Windows)/Option (macOS) and release the slider. The
slider will split into two halves. Release the keys and start adjusting the fringes and
transitioning between the original and the new photo by regulating the distance between
the two parts of the slider.


Click the OK option in the top right of the Layer Style dialog box.
There you have it! A detailed, step-by-step guide for replacing complex skies in photos using Photoshop. Bookmark this guide, as it will help you next time you sit with your editing workflow. If all this time you have wondered how to change the sky from images in Photoshop, this guide is your solution.
Now, it’s time to skim through some quick keyboard shortcuts. These simple yet helpful shortcuts help professionals speed up their sky replacement photo post-production process.
5 handy keyboard shortcuts to speed up your sky-replacement and editing workflow
The below checklist presents some of the quick shortcut keys to activate certain tools. They are:
- Zoom - Keyboard shortcut “Z”. Press and hold the Alt (Windows)/Option (macOS) key and click on the image.
- Brush - Press “B”. Make sure to select “Sky Layer Mask” from the Layers Panel.
- Hand - Press “H” to activate this tool. Used for moving the image around.
- Move - Press “V”. Used to properly position the new sky image on the original version.
- Toggle - Toggle between the “Lasso” and “Polygonal Lasso” tools. Click the Alt (Windows)/Option (macOS).
Conclusion
Advancements in photo editing technology have made it possible to set the mood of the audience in the right way. Regardless of the flaws in an image, Photoshop has solutions to rectify them. This insightful article will surely guide beginners and novices in their sky-changing and editing workflows.
Nonetheless, for mastering any art, practice is the key. So, our suggestion to all first-timers will be to keep practicing with the sky replacement process using advanced Photoshop tools. Eventually, you will find the process to be an easy feat. Alternatively, you may collaborate with professional photo editing companies. They have the support of experts who provide excellent sky replacement services at fair prices.
Follow the above steps and give magnificent perfection to ordinary skylines. Be it for real estate property photos, weddings, or any other event, make every image enchanting and hauntingly beautiful.