A YouTube thumbnail is the first thing you will see when you open the platform on your phone, tablet, or computer. They pop up in the search results on YouTube and even on Google’s search results. If you’ve seen them, you would definitely have noticed how small they are. But that’s not their actual size. In fact YouTube recommends that your thumbnails be large, so they look good when scaled down.
So, what is the best YouTube thumbnail size you should use? How do you make a thumbnail? How do you upload a thumbnail to YouTube?
Read on to find out more.
What is a YouTube thumbnail?
A YouTube thumbnail is an image that represents the contents of the video it is attached to. Thumbnails are visible in search results, on channel pages, and anywhere else you can expect to find a list of videos. You can think of them as book covers, as their purpose is similar- attract the attention of the potential viewer and convince them to click.
A thumbnail actually was only associated with still images, as it was a smaller version of a much larger digital image, like the ones you see in a Google Image search or on wallpaper websites.
The original purpose of the thumbnail was to make it easier for people to browse through many images at once. However, nowadays, even videos are represented with thumbnails.
Standard YouTube thumbnail sizes
The standard sizes for YouTube thumbnails are as follows:
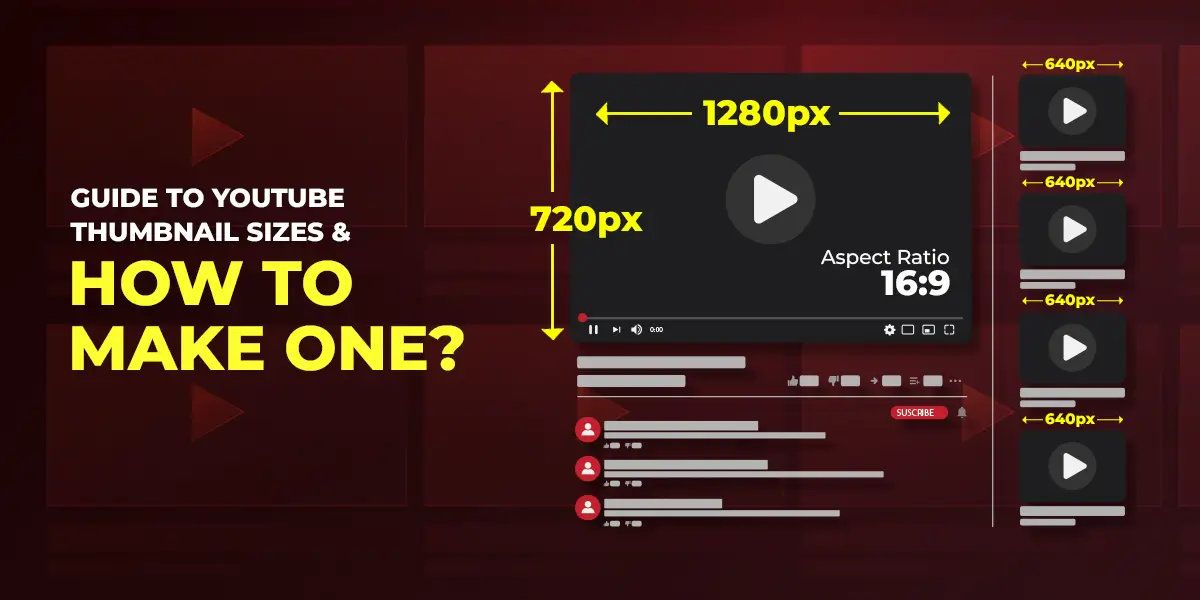
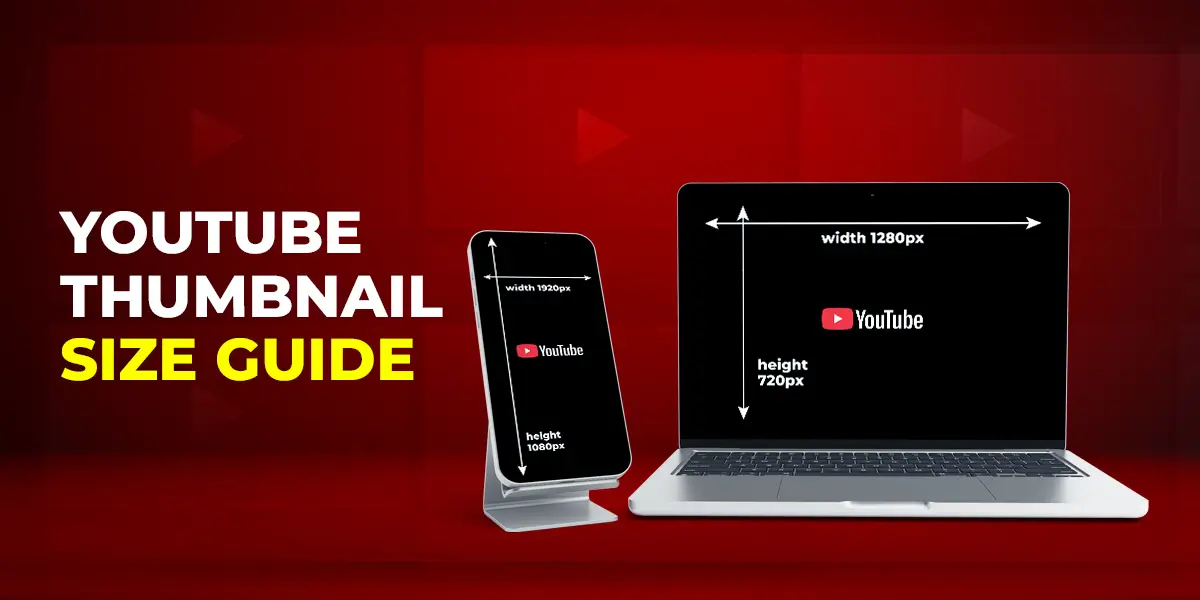
- For regular YouTube videos, the standard thumbnail size (in pixels) is 1280×720 px (or 16:9 aspect ratio). YouTube prescribes a minimum width of 640 px.
- For podcast video thumbnails, the ideal size (in pixels) is 1280×1280 px (or 1:1 aspect ratio).
- For YouTube Shorts, the size in pixels is 1920×1080 px (or 9:16 aspect ratio), which is the same size as the Shorts videos.
The following are the thumbnail sizes in different measuring units:
- YouTube thumbnail in size pixels- 1280 x 720 px
- YouTube thumbnail in size inches- 4.27 × 2.4 in
- YouTube thumbnail size in cms- 10.84 × 6.1 cm
YouTube also has these other specifications you should follow when making your thumbnails:
- Maximum file size: 2 MB.
- Ideal file format: almost any file type, including .jpg, .gif, .png, and .bmp.
How to create a YouTube thumbnail?
By default, YouTube will pick a random frame from your video as the thumbnail when you upload it. However, if you keep this as your thumbnail, your channel won’t look neat or planned. It may not give potential viewers a clear preview of the contents. So, it’s always better to create a custom YouTube thumbnail on your own or outsource this work to a professional company.
If you plan on making the thumbnail yourself, this is what you should do:
-
Step 1: Pick the correct thumbnail size
We’ve already gone over the ideal dimensions for different kinds of YouTube thumbnails. So, if you are making a regular YouTube video, your thumbnail should be 1280 x 720 px (with a minimum width of 640 px). For a podcast video, use the size 1280 x 1280 px. And for a YouTube Short, the size should be 1920 x 1080 px.
-
Step 2: Use a good background
Since you are creating a thumbnail from scratch, you can make it however you like. For the background, you can use a solid color, a gradient of different colors, or shapes to make it look interesting. You can even use an image as the background (most people use a frame from the video), but make sure that you are using a high-quality picture.
If you are using images in the thumbnail, ensure that they are related to the video topic.
-
Step 3: Use graphics
Make your thumbnail more interesting and visually appealing by using graphical elements. For example, you can use an arrow to point at the subject of the video. Some other graphical elements you can use are borders, lines, speech bubbles, sparkles, and so on.
-
Step 4: Add relevant text
Now, vibrant colors and quirky graphics may grab a YouTube user’s attention, but it may not be enough to make them click on your video. That’s why many suggest including relevant text tp give context about the type of YouTube video and the contents. Since thumbnails are small, make sure the text is big enough to read and bold enough to stand out from the rest of the image.
However, don’t crowd the image with too much text. Instead, use limited text and include catchy terms, keywords, or phrases that will tell your audience a little more about the video. Text in the YouTube thumbnail also has the added benefit of ranking better in search results.
-
Step 5: Add branding elements (if any)
Every YouTuber needs good branding to make their content more recognizable. Branding elements for a YouTuber can include logos, taglines, colors, intro and outro styles, catchphrases, etc.
Use these when making your YouTube thumbnail not only for instant brand recognition, but also for a consistent and uniform look on the channel.
-
Step 6: Preview and export the final thumbnail
Once you have finished your thumbnail, check it thoroughly to make sure you haven’t missed anything. To make things easier, maintain a checklist of items to include in the image so you are always on the right track. After accounting for all the missing elements, proofread the text and image for errors, clarity, and quality.
If you feel there are any changes to be made, make the adjustments and then export the image into any of the file types that YouTube supports (JPEG/JPG, PNG, BMP, GIF, etc.).
At any time, if you feel like you need a professional hand at creating your YouTube thumbnails, outsource it to someone who can deliver good results.
Best practices when making YouTube thumbnails (Tips)

-
Keep the thumbnail simple
Thumbnails are small images (even smaller on smartphones), so too much content will make it appear crowded and claustrophobic. Don’t use the full video title and don’t crowd the image with too many graphical elements. If you have really good and engaging frame in your video, you can also choose to use that as your YouTube thumbnail. However, making one from scratch is always better.
-
Use contrasting colors
For better visibility, you should use colors that contrast with each other. Imagine how uncomfortable it is to read white text against a bright yellow background. Both colors are light and it makes it difficult to read. On the other hand, the colors you use should not be in harsh contrast, like red text on a blue background.
If your thumbnail looks harsh or blotchy and difficult to comprehend, the viewer will be less likely to click on your video. You must strike a balance between the colors in a way that makes the text visible and gentle on the eyes. Make the overall image easy on the eyes and visually interesting to entice the user into checking out your video.
-
Pay attention to where you put the logo
When adding your branding elements (like the logo) to the YouTube thumbnail, you should place it in a prominent area where it won’t be missed. The logo shouldn’t be too big as it shouldn’t distract the viewer from the message. On the other hand, it shouldn’t be so small that it’s barely visible, which defeats the purpose of adding it to the thumbnail. Normally, most designers add logos in the top corners of an image because it’s a prominent place and doesn’t get in the way of the other elements.

However, if you can find a creative way to include your logo with the rest of the elements in the thumbnail, feel free to do so.
-
Images should accurately represent the video
Users don’t like it when thumbnails are misleading. It counts as clickbait and hurts your brand image and reputation. Not only that, it goes against YouTube’s policies and your videos will stop showing up in search results and users’ recommended feeds. So always include pictures that are relevant and accurately represent the topic covered.
-
Be consistent in your style
Maintain consistency in the themes you use for your thumbnails. It makes your channel look more professional and put-together. If you are covering different genres on your channel, you can assign a different theme to each genre so it’s easier for viewers to sort through your content. Consistency in thumbnail styles also helps your regular viewers recognize your videos instantly when they come across it in their feed or search results.
-
Use a person in the thumbnail
As far as possible, include a human being in the thumbnail, as it is proven that people feel more trusting of the content when they see a human face, especially if it is familiar. See below how each of these channels has a human person in their video thumbnails, even if the YouTuber or presenter themselves are not present in the image (like in the center thumbnail).

If you are including a picture of your presenter, have them show an emotion on their face, like anger, disgust, happiness, etc., like in the thumbnails on the right and left.

How to add a YouTube video thumbnail
-
For regular YouTube videos
There are two main ways to add YouTube thumbnails: using a frame from the video (default) and making a custom thumbnail.
-
Method 1: Using a frame from the video
By default, YouTube picks out a frame from the video you just uploaded to use as a thumbnail. If you don’t like it, you can choose any of the other thumbnail options YouTube automatically generates from the content. Just click on the edit option (represented by a pencil icon) and select your preferred thumbnail.
This method leaves you with limited options and sometimes, none of the suggestions may look appealing. In that case, you might want to consider using the second method.
-
Method 2: Creating a custom YouTube thumbnail
We always suggest creating your thumbnails from scratch because you have more control this way. Screenshots may not work for every video and sometimes it looks like things are often taken out of context. Additionally, a simple frame from the video looks plain and boring.
We’ve already gone over how to make a custom YouTube thumbnail and the best practices to follow. Once you’re done, just use the edit option after uploading the video and upload the thumbnail you just created.
-
For YouTube Shorts
As of writing this article, YouTube doesn’t have a separate provision for uploading custom YouTube Shorts thumbnails, like with their regular videos. According to YouTube, custom thumbnails aren’t really required for Shorts because most of their views and watch time come from the Shorts feed, and thumbnails aren’t displayed here.
However, thumbnails do appear for Shorts when they are listed alongside the regular videos. So while you can’t upload custom Shorts thumbnails the normal way, you can manage to do it. How?
Well, normally, the only way for you to add a Shorts thumbnail is by scrubbing through the clip and choosing a particular frame as the thumbnail. To add a custom thumbnail, however, you need to create the image first before you make the Short, and then add it as a frame to the clip using a video editing software like Adobe Premier Pro or even Canva. Then, using the normal method, scrub to the custom image you’ve added and select that frame as the thumbnail.
Some points to note
- There is a limit to the number of thumbnails you can upload to YouTube each day. When you reach the limit, you get this error message - “Daily custom thumbnail limit reached.” If you get this pop-up, you need to wait 24 hours till you can upload thumbnails again.
- Don’t add your logo to the bottom right corner of the YouTube thumbnail because that’s where YouTube displays the length of your video.
Over to you now
YouTube thumbnails are important when you think about how your video has to compete for the users’ attention on a daily basis. Every day, millions of videos are being uploaded to YouTube and niches are hard to come by. One of the best ways to get potential viewers to give you a chance is to get the YouTube thumbnail sizes right. It results in crisp, high-quality images and not blurry and blotchy images. In addition to using the right sizes, you must ensure that the thumbnail is representative of the content and the overall look is professional and harmonious.
No. You can’t directly change the thumbnail size once it’s uploaded but you can replace the thumbnail with a new one that’s the right size. No matter how big the image is, though, YouTube will automatically scale it down to make it fit on the website.
The ideal YouTube thumbnail size (width and height) is 1280 x 720 px. The minimum width should be no lesser than 640 px, or it will affect the image quality.
YouTube accepts thumbnails even with the dimensions of 1920 x 1080 px. It’s actually the recommended size for YouTube Shorts. For regular videos, however, YouTube automatically scales down the image to fit on the website, so the largeness doesn’t really matter. However, high-resolution images tend to have higher file sizes, and the maximum file size YouTube will accept is 2MB.
Yes. YouTube Shorts and Instagram Reels are very similar; they’re both short-form video formats. However, they are both different when it comes to their purpose, length, and how they are used. Unlike Instagram Reels, you can link your Shorts videos to your longer video content (if it is an edit or highlight of the longer video). While regular creators can generate more interest for their channel through Shorts, it is also a way for short-form video creators to use the platform and gain an audience. Also, YouTube recently increased the length of Shorts from 60 seconds to 3 minutes (as of October 15, 2024). Instagram Reels are still limited to a maximum length of 90 seconds.