For the longest time, Photoshop has been the gold standard, the preferred tool, for professional photo retouching. In 2026, it has become more powerful, blending classic retouching tools with AI-enhanced features like Generative Fill and Remove Tool to make editing faster, smarter and non-destructive.
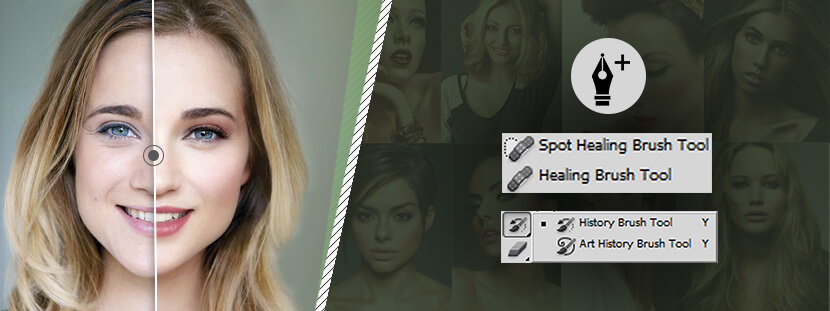
Whether you’re new to photo editing or a professional, knowing what tools are available to you, is vastly helpful. To help you make the most of out of Photoshop’s latest retouching tools and improve your editing workflow, we’ve made this comprehensive guide.
Best Photoshop Retouching Tools for 2026
-
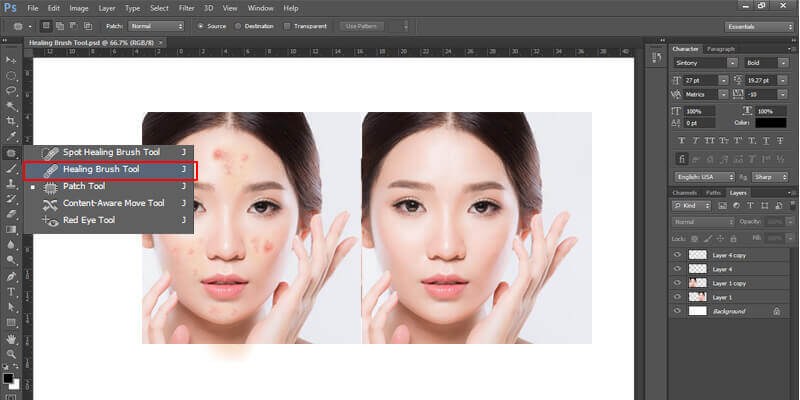
Healing Brush Tool

The Healing Brush removes blemishes, wrinkles, irregular skin tones and imperfections by sampling pixels and blending the pixels seamlessly. You can compare it to the Clone Stamp tool, but the main difference is that it preserves the texture, transparency, shading and lighting of the sample pixels.
Where to find it: It is grouped under the Spot Healing Brush Tool in the Toolbar
How to use:
- Select the Healing Brush tool and hold the pointer over an area of the image you want to use as the sampling point.
- Alt-click (Windows) / Option-click (Mac) to set a sample point.
- Paint over the imperfections. Each time you release the mouse button, Photoshop will blend the sampled pixels with the target pixels.
Options Bar settings:
- Brush Size & Hardness- for adjusting the blending softness.
- Mode- for setting the blending mode (Normal, Replace, Multiply etc.). Selecting Replace helps preserve film grain, texture and noise around the edges of the brush stroke (when using a soft‑edge brush).
- Aligned- for controlling whether the sampling source moves with the cursor or stays fixed (continuous sampling vs. single sample).
- Sample- for sampling pixels from all visible layers (useful for changing separate layers without affecting the original). You can control how many layers to sample by choosing either Current Layer, Current & Below or All Layers.
Pro tip: Use a soft brush and sample frequently to avoid repeating patterns.
Note: If you want to use a different image as the sample, both pictures should be in the same color mode, unless one is in Grayscale.
-
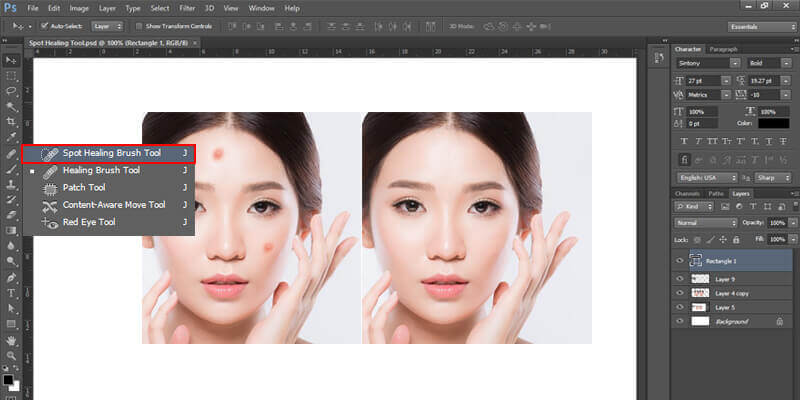
Spot Healing Tool
It’s a faster version of the regular Healing Brush tool and automatically samples surrounding pixels. Spot Healing Brush tool is ideal for small/quick touch-ups (removal of dust, scratches or small blemishes). Spot Healing Brush tool is different from the Healing Brush tool in that you don’t have to select a sampling spot as the tool will automatically sample the surrounding area.
Where to find it: Toolbar → Spot Healing Brush Tool.
How to use:
- Select the Spot Healing Brush.
- Set the brush Hardness, Spacing and Size. Ideally, the brush size should be slightly larger than the defect.
- Click or drag over the flaw—Photoshop auto-fixes it.
Pro tip: In the Options Bar, try Content-Aware mode for better blending of colors or complex textures. Go to Type and select Content Aware and click or drag over the flaw. Photoshop will auto-fix the selection by comparing nearby image content, realistically maintaining important details like object edges and shadows.
-
Patch Tool
The Patch Tool repairs larger areas by letting you draw a selection and replace it with pixels from another area. It is an absolutely great tool for clothing, skin, or background fixes.
Where to find it: It is grouped with Healing tools in the Toolbar.
How to use:
- Select the Patch Tool.
- Draw around the area to fix to make a selection line.
- Drag the selection to a “clean” area you want to sample.
- You can adjust the selection in the following ways:
- Shift-drag in the image to add more parts to the selection.
- Alt-drag (for Windows)/Option-drag (macOS) in the image to remove parts from the selection.
- Alt/Option-Shift-drag in the image to select intersecting areas of the existing selection.
Pro tip: Switch between Source and Destination modes to replace or duplicate content (respectfully).
You can either:-
Click and drag to select the area you want to repair, go to the options bar and select Source.
Or,
Click and drag to select the area you want to sample, go to the options bar and select Destination.
-
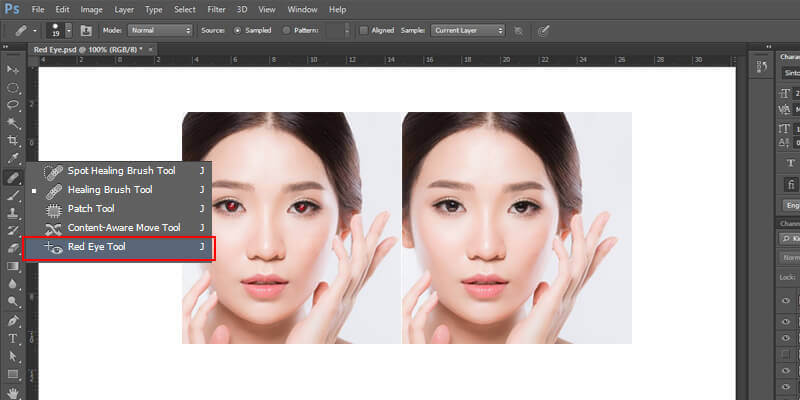
Red Eye
It instantly removes the red-eye effect generally caused by flash photography.
Where to find it: It is clubbed with Spot Healing Brush in the Toolbar.
How to use:
- Select the Red Eye Tool.
- Click on the subject’s eyes and Photoshop will neutralize the red automatically.
Pro tip: Adjust Pupil Size and Darken Amount in the Options Bar for natural results. Pupil Size increases/decreases the area affected by the tool. Darken Amount helps set how dark the correction will be.
-
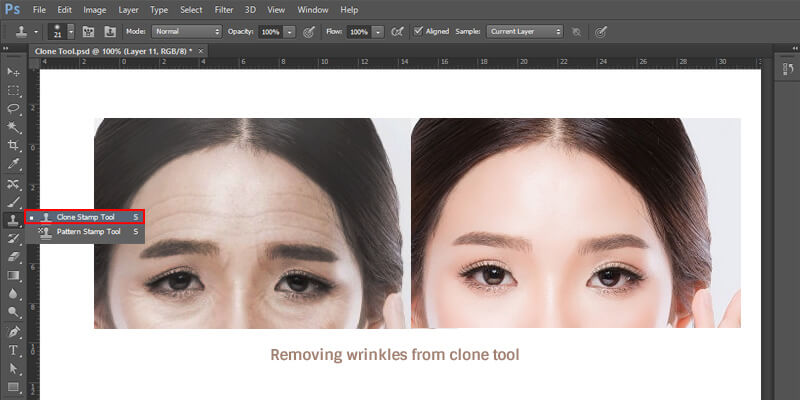
Clone Stamp Tool
It directly copies pixels from one part of an image to another in the same image. The Clone Stamp tool can also copy from one layer and paste on another layer. It’s indispensable for precise retouching where texture and detail must be preserved.
Where to find it: Toolbar → Clone Stamp Tool.
How to use:
- Select the Clone Stamp.
- Alt/Option-click to sample from an area.
- Click to paint over the target area.
Pro tip: Work on a new empty layer with Sample All Layers enabled for non-destructive editing. Also, you can fix the sample area, or make it change every time you release the mouse button, by deselecting or selecting the Aligned option, respectively.
-
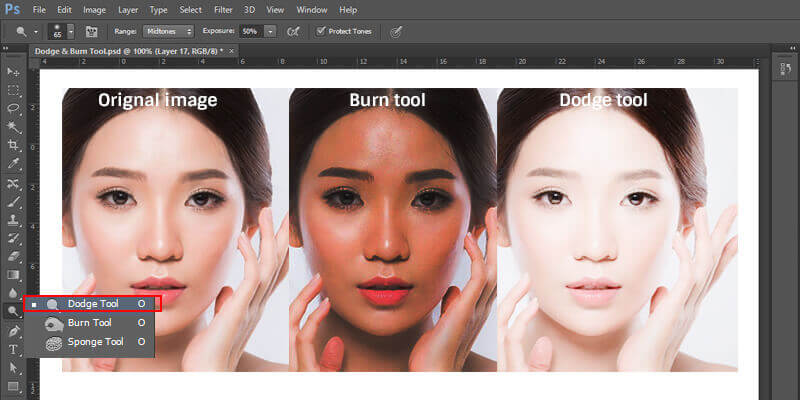
Dodge & Burn Tool
Dodge lightens pixels, while the Burn tool darkens them. They make highlights, shadows and midtones pop, which is great for portrait retouching.
Where to find it: Toolbar → Dodge/Burn Tool group.
How to use:
- Select Dodge (lighten) or Burn (darken).
- Set the Range (Midtones, Shadows, Highlights) in the Options Bar.
- Paint lightly over the areas to adjust.
Pro tip: Use low exposure (5–10%) and build up gradually for natural effects.
-
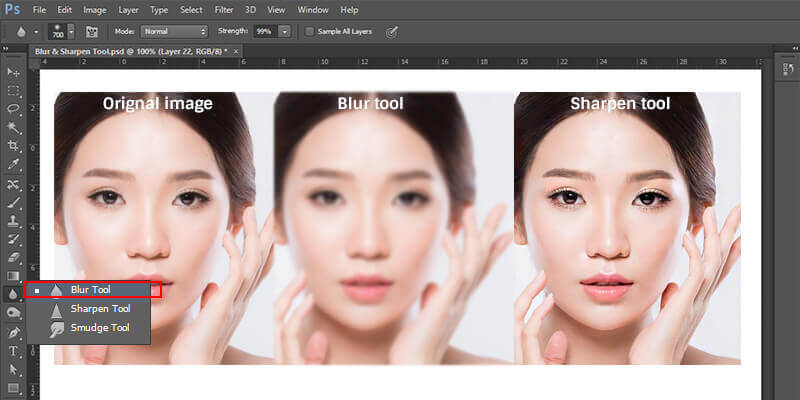
Blur & Sharpen Tool
The Blur tool softens edges and reduces details in an image, while Sharpen increases edge contrast to distinguish detail. While they’re both useful for quick touch-ups, they should be used sparingly to avoid creation of artifacts (visual anomalies).
Where to find it: Toolbar → Blur/Sharpen Tool group.
How to use:
- Blur Tool:
Select the Blur tool.
Brush over rough textures or distracting backgrounds. - Sharpen Tool:
Select the Sharpen tool.
Brush over eyes, jewelry or other fine details to make them ‘pop’.
Pro tip: For greater/advanced control, use Smart Sharpen (Filter → Sharpen → Smart Sharpen), instead of the basic Sharpen Tool.
- Blur Tool:
-
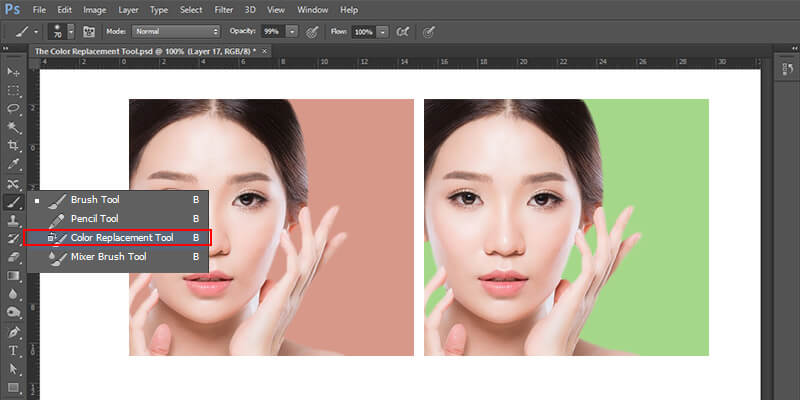
The Color Replacement Tool
It replaces a selected color with a new one in an image by painting over it, while also keeping the texture and shading intact.
Where to find it: It is grouped together with Brush tools.
How to use:
- Select the Color Replacement Tool.
- Choose the foreground color.
- In the Options Bar, set brush size, sampling mode and tolerance.
- Paint over the target color to replace it.
Pro tip: For greater precision, use Select → Color Range to pick the color you want to replace, then apply adjustments in the Hue/Saturation section.
For non-destructive edits, you can use the more powerful Replace Color Command by going to Image > Adjustments > Replace Color or Hue/Saturation. You could also make selections in the image before painting your new color.
-
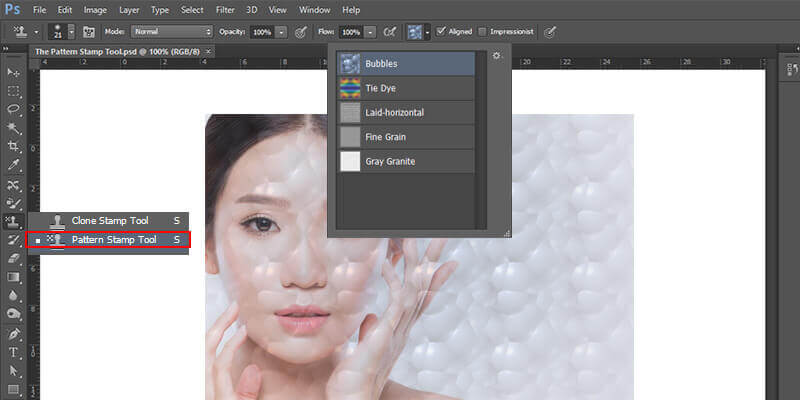
Pattern Stamp Tool
Instead of sampled pixels, the Pattern Stamp Tool paints a repeating pattern on the target area of the image, canvas or selection. The patterns are usually stored in Photoshop, although you can also choose a custom pattern from the Pattern pop-up panel. The Pattern Stamp tool is most often used to make creative backgrounds or restore textures.
Where to find it: It is grouped with the Clone Stamp tool.
How to use:
- Select the Pattern Stamp Tool from the toolbar.
- In the Options Bar, choose a pattern.
- Paint (click and drag) onto the desired areas of the canvas/image to apply the pattern.
Pro tip: Combine it with Layer Masks for a seamless blend.
-
Content-Aware Fill (AI-Powered)
Although not a separate tool in Photoshop, it is a powerful feature that automatically fills selections with surrounding content. In 2026, Content-Aware Fill has been enhanced with Generative AI, producing smarter, more natural results.
Where to find it: Edit → Content-Aware Fill OR Right-click selection → Content-Aware Fill.
How to use:
- Make a selection around the object. Keep the selection loose.
- Open the Content-Aware Fill workspace (which has advanced controls and a live preview). You could also press Shift and F5, select “Content-Aware” from the options and click OK.
- In the workspace, use the brushing tools to adjust the green sampling area (what Photoshop uses to fill).
- Adjust the settings in the panel to fine tune the results (like Color Adaptation and Scale).
- Set output to “New Layer” for non-destructive editing.
- Click OK to apply the changes.
Pro tip: Combine Content-Aware Fill with Generative Fill for more creative control over the outcome.
-
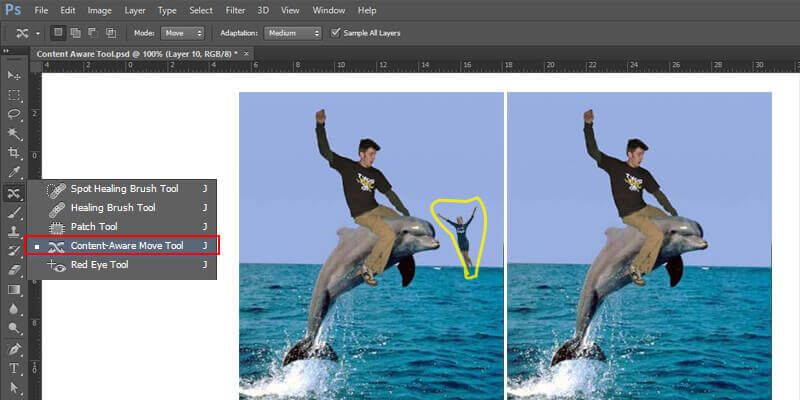
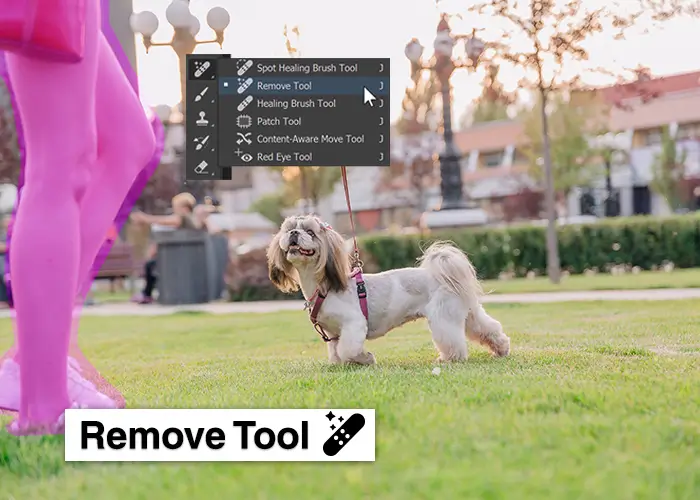
Remove Tool (AI-Driven)
The Remove Tool is a new tool included in Photoshop 2026 and quickly deletes unwanted objects when you brush over them. It uses AI to fill the area seamlessly.
Where to find it: It is grouped under the Spot Healing Brush tool in the Toolbar
How to use:
- Select the Remove Tool. If you can’t find it in the Toolbar, go to Edit Toolbar and check if it is in the extra tools section, then drag it into your visible toolbar.
- Brush over the object you want to erase.
- Photoshop will intelligently replace the brushed area with background pixels.
Pro tip: If the result isn’t perfect, undo and brush over the area in smaller strokes.
-
Liquify Tool
The Liquify Tool lets you push, pull, warp and reshape parts of an image. It exists as a filter that distorts pictures. There are different ways to liquify, like Forward Warp tool, Twirl Clockwise tool, Pucker tool, and Bloat tool. The Face-Aware Liquify feature automatically detects facial features for subtle and precise adjustments.
Where to find it: Filter → Liquify.
How to use:
- Select the layer you want to modify.
- Open Liquify from the Filter menu.
- In the Liquify dialog box, choose the tool you want to use, like Forward Warp (to reshape) or Face-Aware Liquify (to adjust eyes, nose, mouth and jaw with sliders).
- Adjust the brush settings for size, density and pressure to control the nature/extent of the effect.
- Click and drag to apply the distortion on the image.
- Use Show backdrop to compare the original image and the edits. Use Reconstruct to undo unwanted changes.
- Click OK to apply the changes to your image.
Pro tip:For Liquify, it is recommended to first convert the image/layer to a Smart Object for non-destructive editing.
-
Sky Replacement (AI Feature)
An Adobe Firefly feature that lets you automatically replace skies in landscape or portrait images, adjusting color and lighting to match the new sky.
Where to find it: Edit → Sky Replacement.
How to use:
- Select Sky Replacement.
- Choose from Photoshop’s built-in sky presets or load your own.
- Adjust edge fade, brightness and color temperature of the new sky.
Pro tip: Add adjustment layers after replacement to unify the entire photo.
-
Generative Fill (2026 Highlight)
Generative Fill is not a separate tool, but it is a core AI feature in Photoshop that lets you add, remove or expand content with text prompts. It makes retouching or creative editing much quicker and easier.
Where to find it: Contextual Task Bar (appears after making a selection) → Generative Fill.
How to use:
- Make a selection.
- Click Generative Fill in the Contextual Task Bar.
- Type a text prompt (or leave it blank for Photoshop to fill the selection naturally, based on the surroundings).
- (Optional) You can upload a reference image that has the desired content and add a prompt (if you want) to get adjust the result.
- Choose from multiple AI-generated variations in the previews and click on Generate.
Pro tip: Use it to extend canvas backgrounds, remove objects, or even add missing details.
Wrapping it Up…
Photoshop 2026 now gives you the best of both worlds- classic retouching tools that professionals rely on and the latest AI-powered features that speed up editing dramatically. From precise edits and fixes with the Healing Brush to full-blown advanced object removal with Generative Fill, it takes a mastery of all the features and tools to produce flawless, professional-quality images.
In our list, we gave you a few filters you can use for retouching, but if you would like to learn about all the filters in Photoshop (in great detail), we suggested checking out our blog on the Top 15 Types of Photoshop Filters Explained.
Frequently Asked Questions
You can either use the Remove Tool for quick fixes or Content-Aware Fill/Generative Fill for more precise control over the outcomes.
Yes, Photoshop 2026 comes with AI-enhanced features like Generative Fill, Remove Tool, Content-Aware Fill and Sky Replacement for quick and easy retouching.